Canvas - Setting Up a New Course
This document explains how to configure the most important settings in Canvas when creating a new course, based on feedback from faculty, students, and Instructure. You will find this document most useful if you need to set up a new course relatively quickly.
Part 1: Set Up Course Navigation
The Course Navigation Menu controls what students see on the left side of the course screen. You can find out more background information on the Course Navigation menu by reading Canvas: Course Navigation Menu.
- In your new course, go to Settings.
- Click the Navigation tab.
- Add and remove items from the upper list (enabled items) to include the following tools. These are the foundational items that are most commonly necessary in all Canvas courses. Note that the sequence of these items cannot be changed, in order to match Canvas documentation. For more information, see Canvas: Course Navigation Menu.
- Home
- Announcements
- Assignments
- Grades
- Syllabus
- If your course will use online discussions, add the Discussions tool. You should add discussions directly to content modules, but adding the Discussions page ensures that the new discussion post icon on the Dashboard works correctly.
- If you want students to self sign-up in groups, also add the People page.
- If you are going to manually assign students to groups, you don't need the People page.
You now have the minimal pages needed to create a course. You can add additional pages as needed. For more information, see Canvas (Course Template) - Template Effects on the Course Navigation Menu.
Part 2 (Optional): Add Redirect Links
The Redirect Tool is a very simple LTI application that allows instructors and designers to add links to external sites to Course Navigation. To add a redirect link:- Open a course in which you are a teacher or designer.
- In Course Navigation, click Settings.
- Select the Apps tab.
- In the Filter by name field, type redirect and press ENTER.
- Click the Redirect Tool (it looks like a blue arrow).
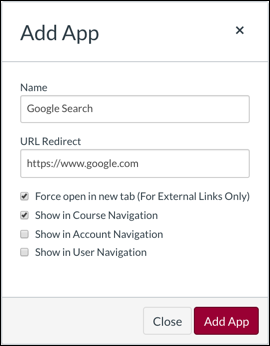
- Click + Add App.
- In the Name field, enter a name for the link. This will appear on Course Navigation.
- In the URL Redirect field, enter the URL the link should launch.
- Select Show in Course Navigation.
- Confirm that your screen looks similar to this:
- Click Add App.
- Refresh your browser.
- Confirm that the link appears in Course Navigation.
Part 3: Change Course Settings
- In the course Settings area, return to the Course Details tab.
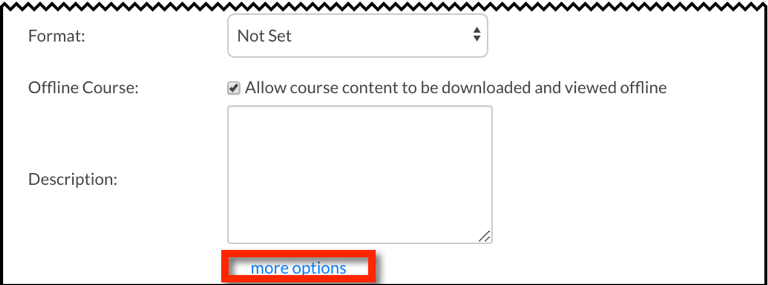
- Scroll down to the bottom of the settings and click more options.
- By default, Canvas will show the most recent three announcements at the top of the Home page. However, you can change this to a number between 1 and 15 by adjusting the number in front of the Number of announcements shown on the homepage field. If desired, change this number.
- Some instructors prefer a smaller number of announcements because the list of announcements can't be collapsed and creates an undesirable amount of scrolling. In addition, the newest announcement always appears at the top of the list, even if none have been created in quite some time, which may desensitize students to announcements over time.
- If desired, clear these two boxes:
- Let students create discussion topics. Clearing this box prevents students from creating completely new discussion topics while still allowing them to post to existing topics. Many instructors prefer to restrict this ability so that students don't create a new topic that is meant to be a reply to an existing, graded discussion.
- Let students edit or delete their own discussion posts. Clearing this box prevents students from editing or deleting submissions to online discussions. Many instructors prefer to restrict this ability so students can change responses to graded discussions.
- Does your course include group work?
- If no, clear the Let students organize their own groups box.
- If yes and you will make the groups, clear the Let students organize their own groups box.
- If yes and students can make their own groups, leave Let students organize their own groups box selected and make sure you've added People to the Course Navigation menu.
- Do you want all students to be able to see how grades are distributed in your course? This can appear as a box-and-whisker plot that is visible to students per individual graded quiz.
- If yes, leave the Hide grade distribution graphs from students box cleared.
- If no, check the Hide grade distribution graphs from students box.
- Click Update Course Details.


