AirMedia (Windows and Mac)
The AirMedia application must be installed in order to use the AirMedia system.
The exception to this is when a Crestron Connect Adapter, or "Puck", is paired with the AirMedia. The Puck acts as a wireless wire and requires no software.
Windows
Windows - AirMedia installation on faculty and staff computers
- Click on the Search icon in the lower left corner of the screen.

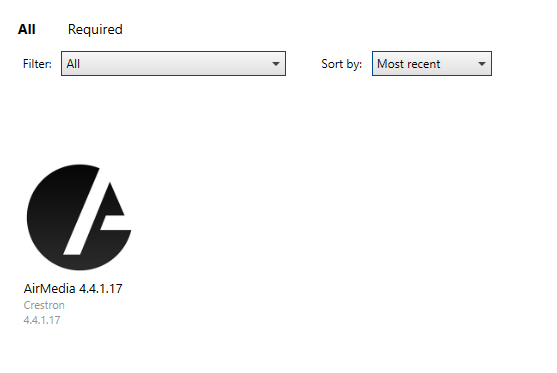
- Search for Software Center and double click on it to open.

- In the software center, locate and click on AirMedia.
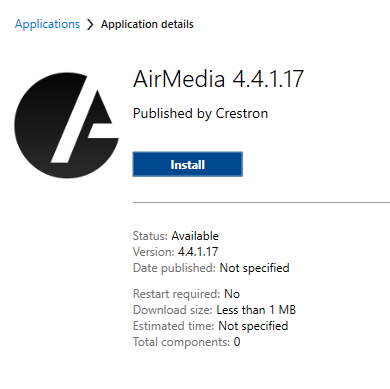
- This screen should pop up. Click on the Install button.
- After the status changes to "Installed", once again click on the Search icon in the lower left corner of the screen and search for AirMedia, click on it to open.
- On the bottom taskbar, right click on the AirMedia logo and click on Pin to taskbar. After it is pinned to the taskbar you can click on the AirMedia icon to open.

After installing, Disable Auto Discovery
- Open Crestron AirMedia.

- Click Options > Settings

- Auto Discovery is on by default, click the circle to turn it off. Auto Discovery should now be off by default.

- Open Crestron AirMedia.
Windows - AirMedia Installation on Managed Student Computers
- Click the search button in the taskbar to open search

- Search for "Company Portal"

- Click the apps button in the left-side menu

- Click the latest version of AirMedia available in the store

- Select install to install AirMedia

After installing, Disable Auto Discovery
- Open Crestron AirMedia.
- Click Options > Settings
- Auto Discovery is on by default, click the circle to turn it off. Auto Discovery should now be off by default.
Windows - AirMedia Installation on Personal and Guest computers
-
- Open a browser and enter the AirMedia's IP address that is displayed on the monitor into the browser address bar.
- AirMedia will load. Click Start Presenting

- Click Windows button

- The app will download into your downloads folder. Double click this file.

- This should automatically launch the app and install it. To continue to presenting, click the blue Agree button.

- Select the blue OK button.

- Enter the AirMedia code that is displayed on the monitor into the box and then click Connect.

- Open a browser and enter the AirMedia's IP address that is displayed on the monitor into the browser address bar.
Windows - Using AirMedia
- Select AirMedia on the room's controller.
- Open the AirMedia app on your laptop.
- On the projected AirMedia image, find the host name or IP address (example: SORH205 or 192.168.165.13)

- Type the host name or IP address into the search window of the AirMedia app, then hit enter. If you are unable to connect using the host name, try using the IP address.
NOTE: If you are on "Stout Guest" WiFi, you will only be able to use the IP address.

- Hit enter on your keyboard to connect.
- Enter the code displayed AirMedia device. Once entered, click Connect.
Note: most AirMedia will show the code in the lower left corner of the displayed image, newer models have a pop up window in the middle of the displayed image.
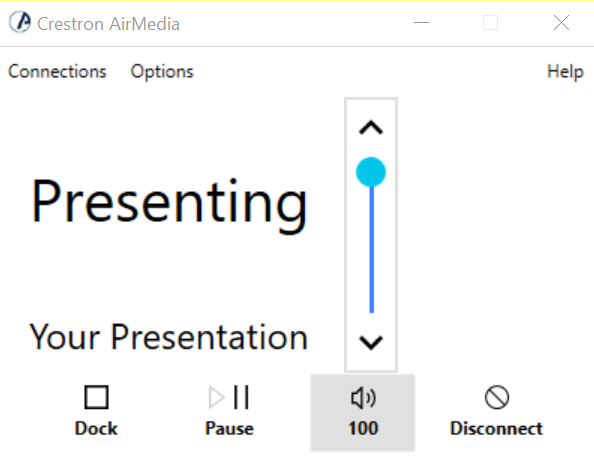
- When connected, this pop up should appear. You can minimize the pop up.

- The Pause button will freeze your computer display so that what is on the display will stay there until you click Resume.

- The laptop's main volume will automatically mute and sound will be controlled via the AirMedia app. Do not adjust or unmute your laptop's main audio controls.
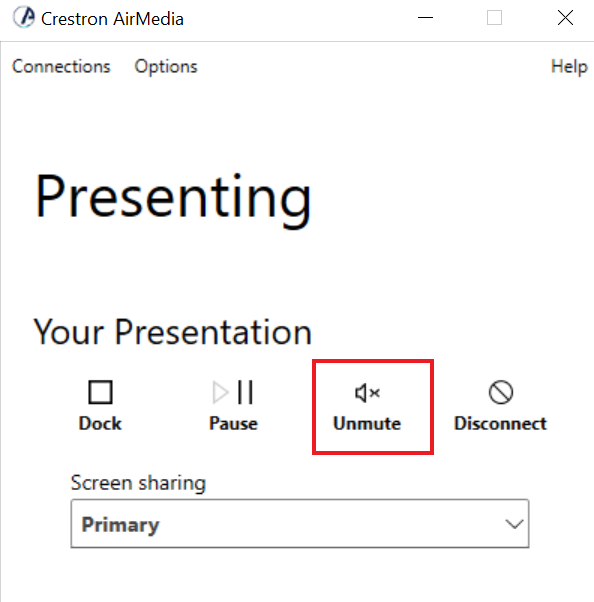
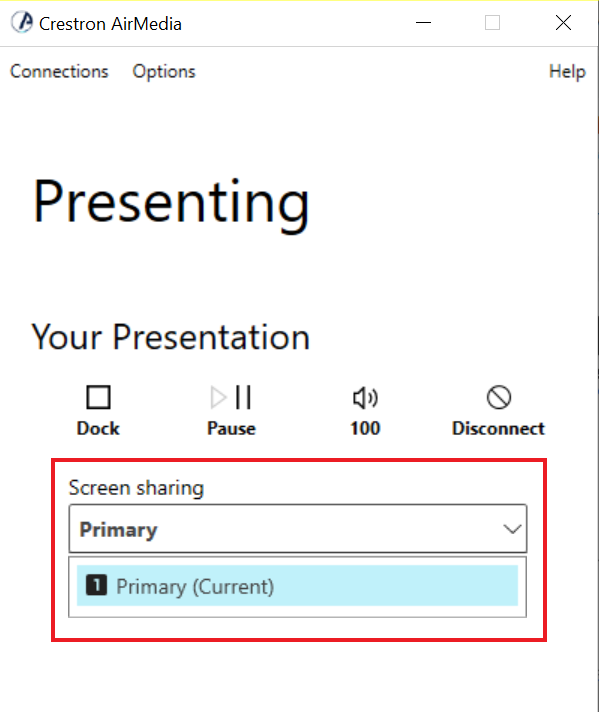
- If you click the drop down arrow next to Screen Sharing you will have the option to change the video source from your primary and secondary screens.
- If you have multiple screen options, you can set your screen positions into a quad. Click on Options > Screen Position.

- To exit Air Media, click Disconnect on the AirMedia Pop Up Window.

Mac
Mac - AirMedia Installation On Faculty & Staff Computers
- Click the search icon in the top right of the screen.

- Search for Self Service. Click to open.

- You may be prompted to enter your username and password. You can check the Remember Me option for future convenience.

- Scroll down the applications until you find AirMedia. Click Install.

Your application will now be installed and should appear in your Application folder.
*Note* AirMedia will be nested within the Crestron folder in the Application folder.

After installing, Disable Auto Discovery
- Open Crestron AirMedia.
- Click Options > Settings
- Auto Discovery is on by default, click the circle to turn it off. Auto Discovery should now be off by default.
Mac - AirMedia Installation on Managed Student Computers
- Click the search icon in the top right to open Spotlight

- Search for Managed Software Center and hit enter

- Find AirMedia in the Software Center and click install.

Your application will now be installed and should appear in your Application folder.
*Note* AirMedia will be nested within the Crestron folder in the Application folder.
After installing, Disable Auto Discovery
- Open Crestron AirMedia.
- Click Options > Settings
- Auto Discovery is on by default, click the circle to turn it off. Auto Discovery should now be off by default.
Mac - AirMedia Installation on Personal & Guest Computers
- Open a browser and enter the IP into the search bar.
- Click Start Presenting
- Click Mac button

- The app will download into your downloads file. It will be a .dmg file.
- The Finder window will open with the Crestron AirMedia app. Double click the app.
- Click blue Open button

- Click the blue Agree button

- Click the blue OK button

Mac - Using AirMedia
- On the projected image, note the AirMedia hostname or IP address

- After opening AirMedia app, type the hostname (ex. SORH205) or IP (ex. 192.168.165.13) into search bar in the top right of the AirMedia window and hit return key. This will temporarily enable AirPlay on the device.

- A pop-up should appear in the middle of the window asking for a PIN number. Enter the pin number shown on the screen to connect the Crestron AirMedia app to the display

- Next, go to the control center at the top right of the screen.

-
Click on Screen Mirroring.

-
Select the hostname you are trying to connect to.

-
When prompted, type in the code shown on the projector or monitor display (It should be the same as before) to start mirroring to the display.

The laptop will now be AirPlay casting to the display. Volume and settings can be adjusted in the system. Ensure the sound output is set to the AirPlay device.
If you disconnect from the display and still have the AirMedia app open, you can reconnect by clicking the orange information icon and going back to step 4.
When disconnecting from the display, ensure the AirPlay connection is ended and the AirMedia app is closed.
Other Platforms:
iOS: See AirMedia (iPad): How to Use AirMedia with an iPad
Android: See AirMedia (Android): How to use AirMedia on Android