Perceptive Content: Capture Profile Shop@UW+
The article will talk about imaging shop@UW documents, routing for approval and storage for retrieval as needed.
Set up the Shop@UW+ option
- You can setup as many capture profiles as you need.
- You are the only one that can see them.
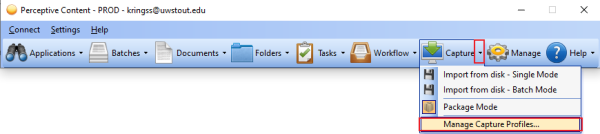
- Log into the ImageNow/Perceptive Content desktop client.
- Point to the down arrow next to Capture and click to see the drop down menu.
- Select Manage Capture Profiles.
Select Create.

The ImageNow Printer dialog box will appear, please use the down arrows to select the options to match the dialog boxes below.
Name: Show@UW+
Source: ImageNow Printer
Mode: Single
Send to: Your Work Flow (Workflow send to should be your workflow queue.)

Click the Single tab and use the down arrow to select the L_PMM Shop@UW application plan. Click OK to close and complete.

Your new profile will show in the Capture Profile dialogue box. Select Close
