Topics Map > Service Catalog
Topics Map > AccessStout
Microsoft Authenticator: Enrollment Using a Mobile Device
Microsoft Authenticator

UW-Stout uses Microsoft Authenticator for Multi Factor Authentication.
There are two options to enroll:
- Manually: If MS Authenticator has not been turned on for your account follow the steps in the Setting up Microsoft Authenticator Manually section.
- Prompt: If MS Authenticator has been turned on for your account, when you log into Microsoft 365 online, you will be prompted for More information required to begin the Microsoft Authenticator enrollment . Follow the steps in the Enrolling with a Prompt from Microsoft section.
Some Known Issues with Enrolling
If you run into any of the following issues, please contact the Technology Help Desk at 715-232-5000 or techdesk@uwstout.edu and they can reset your account.
- It appears that you are already enrolled with your Stout account, and it will not let you enroll again.
- You get a prompt on your computer to add the 2-digit code to the Authenticator App on your phone, but the App does not prompt you to enter the code.
Setting up Microsoft Authenticator Manually on a Computer
You can view an example of this process from another University on this video: https://www.youtube.com/watch?v=gPuqClJlQYI
- On your computer, visit https://aka.ms/mysecurityinfo. Select Add Method

- Choose Authenticator app.

- Computer: Follow the prompts on the following screens. Once the Microsoft Authenticator app is installed on your mobile device, click Next. (See direction below for steps on installing the app on your mobile device)

Download the Microsoft Authenticator App
Download the Microsoft Authenticator App if you haven't done this yet.

Visit the Apple app store or Google play store on your mobile device and install the Microsoft Authenticator app. Alternatively, visit aka.ms/authapp to find QR Codes that will send you to the store for your Apple or Android mobile device.
You may also search in the Google Play store or Apple App store for "Microsoft Authenticator" to manually download.*(If manually downloading, please be aware of of the app that you are downloading. It should be fully named "Microsoft Authenticator") -
Computer: Set up your account on the Authenticator App. Click on Next.

-
Computer: A QR Code will appear in the next step. You will come back to this QR code on your computer and scan with your mobile device.

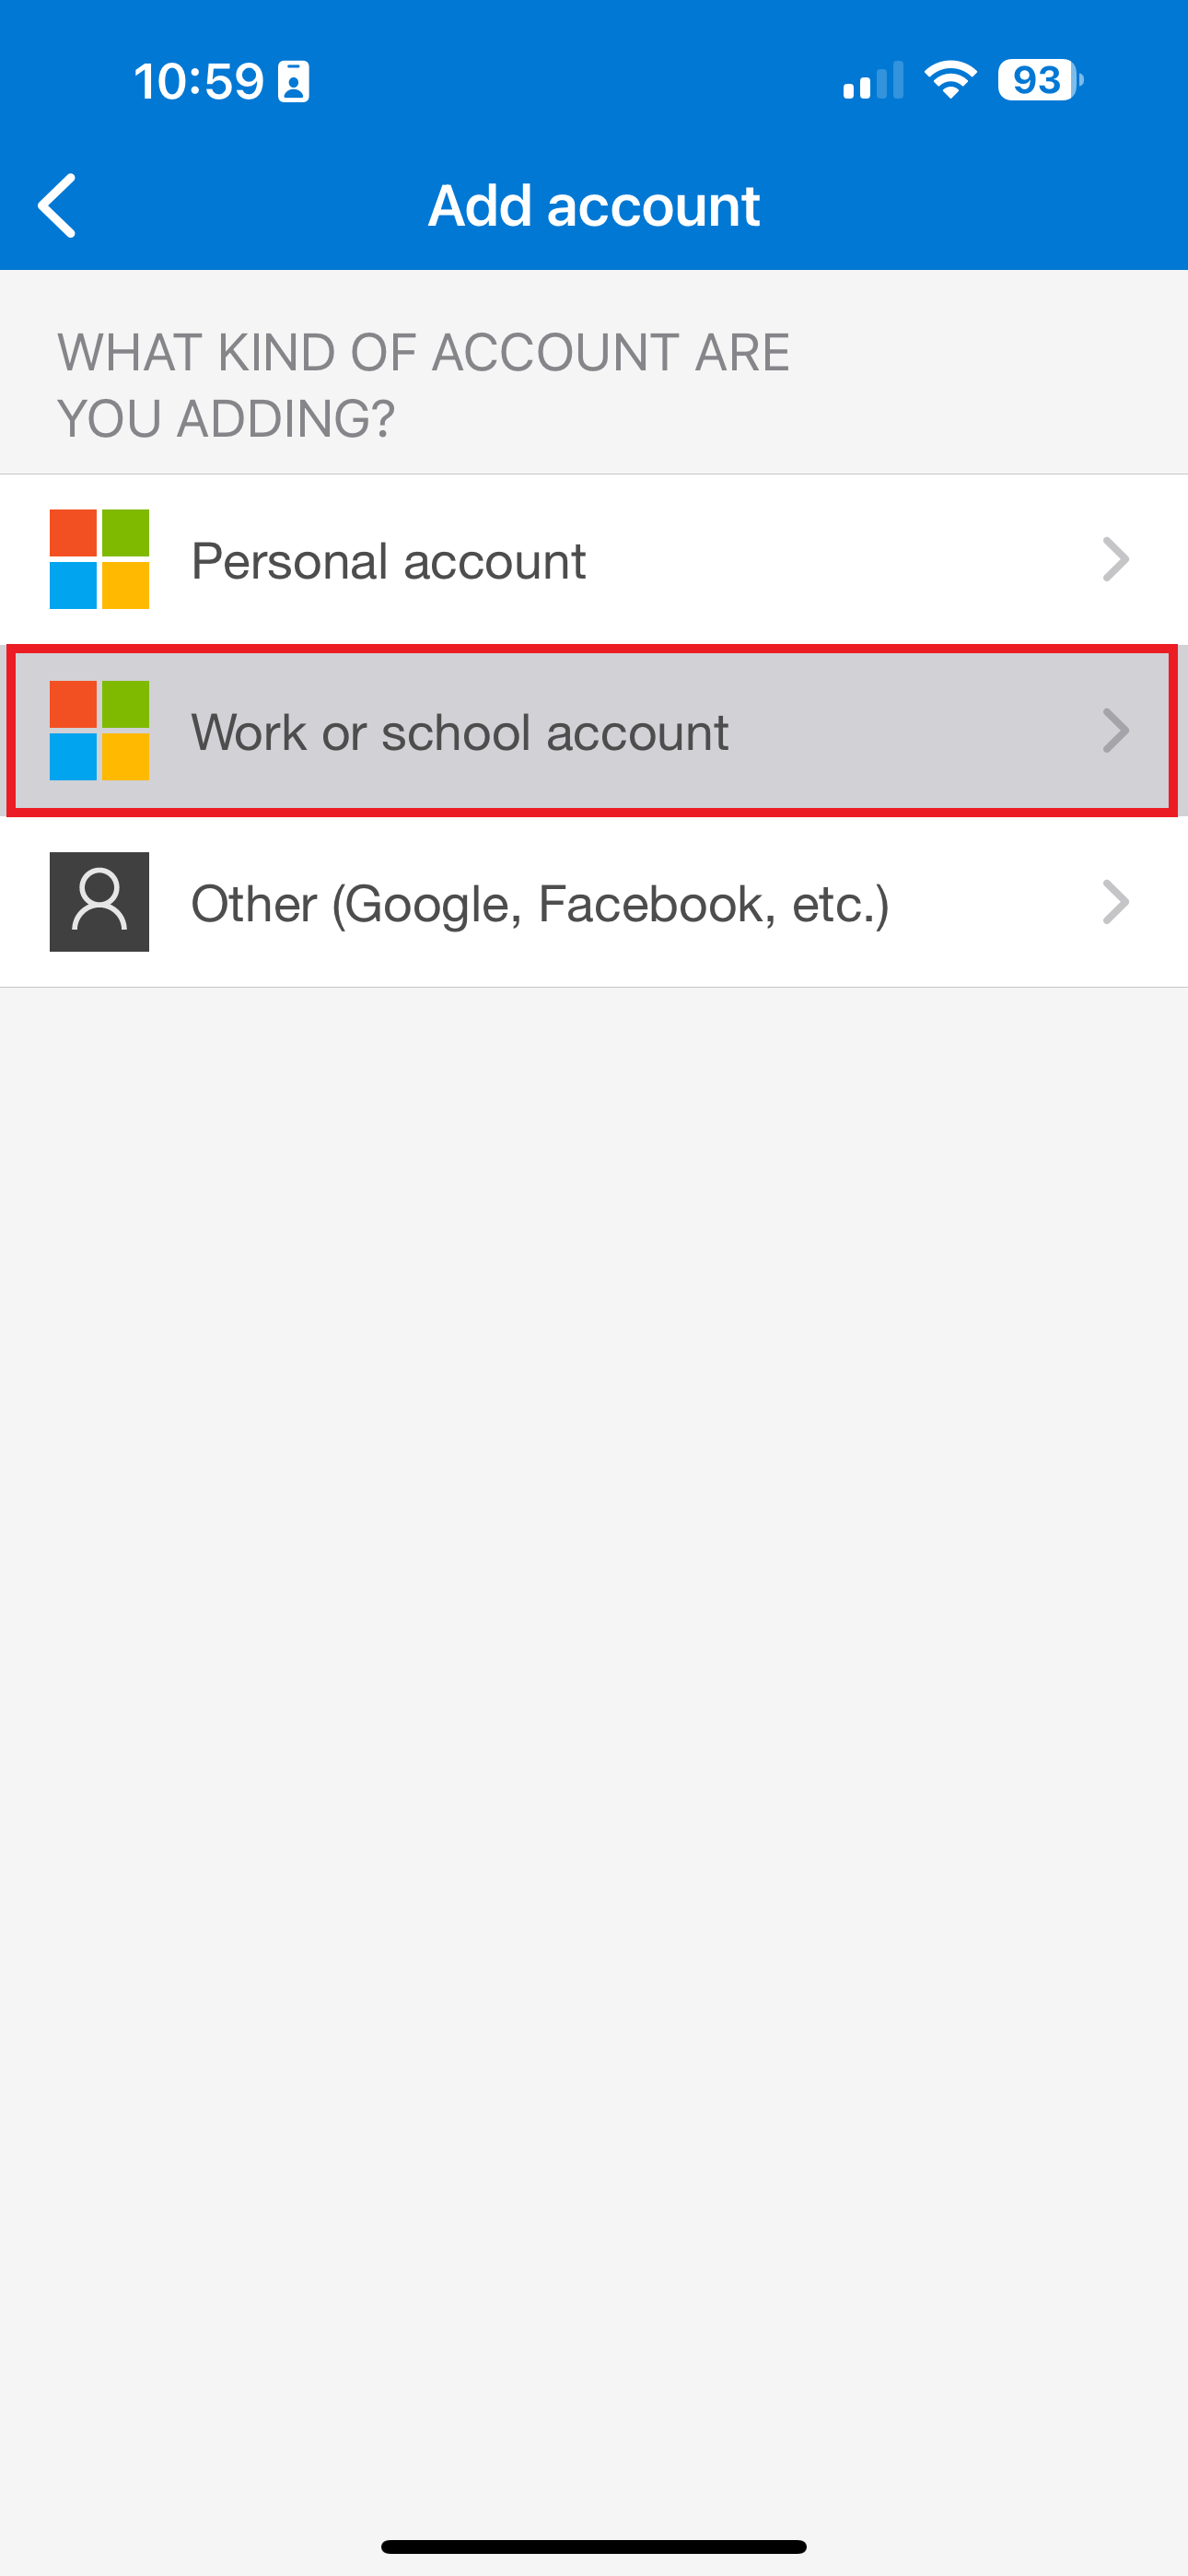
- Mobile Device: Open the Microsoft Authenticator app on your mobile device and select Add work or school account.
- iPhone users press the PLUS button at the top right corner first to add an account, then select work or school account.
Android and iPhone Android iPhone 
.png)
- iPhone users press the PLUS button at the top right corner first to add an account, then select work or school account.
- Mobile Device: Choose Scan a QR code. (Do NOT choose Sign In)
Android and iPhone Android iPhone 

- Computer: Back on your computer, scan the QR code with Microsoft Authenticator app on your mobile device to enable your account. Once the scan is successful, click Next.

Can't Scan?
If you are unable to Scan the QR code, select the Can't Scan image? option which will provide you with a code to copy and a URL to visit to activate.
If you can't scan because it says that your account has already been activated and there is a UW-Stout account on your mobile app, please click Next to continue as normal.
Please contact the helpdesk at 715-232-5000 if errors still occur.
.png)
- Computer: Complete Setup - Microsoft Authenticator will prompt you on your computer screen with a number to enter in your mobile app. Your mobile app will detect that a sign in is being requested.

- Mobile Device: Enter the number shown in your Microsoft Authenticator App on your mobile device and then click Yes on your mobile device to approve.
Activate Android iPhone 


Enroll in Microsoft MFA Manually on a Mobile Phone Without Access to a Computer
This guide provides step-by-step instructions for enrolling in Microsoft MFA (Multi-Factor Authentication) on a mobile phone when no computer is available. The process involves using the Microsoft Authenticator app and switching between apps on the phone to complete the setup.
Step 1: Install Microsoft Authenticator App and Open It
- Go to the app store on your device and download Microsoft Authenticator:
Step 2: Select Work or School Account
- If this is the first time you're using the app, you'll select the "Add work or School Account" option.
- If you've previously used Microsoft Authenticator, you'll select the plus arrow in the top right, and then Work or School Account.
.png)
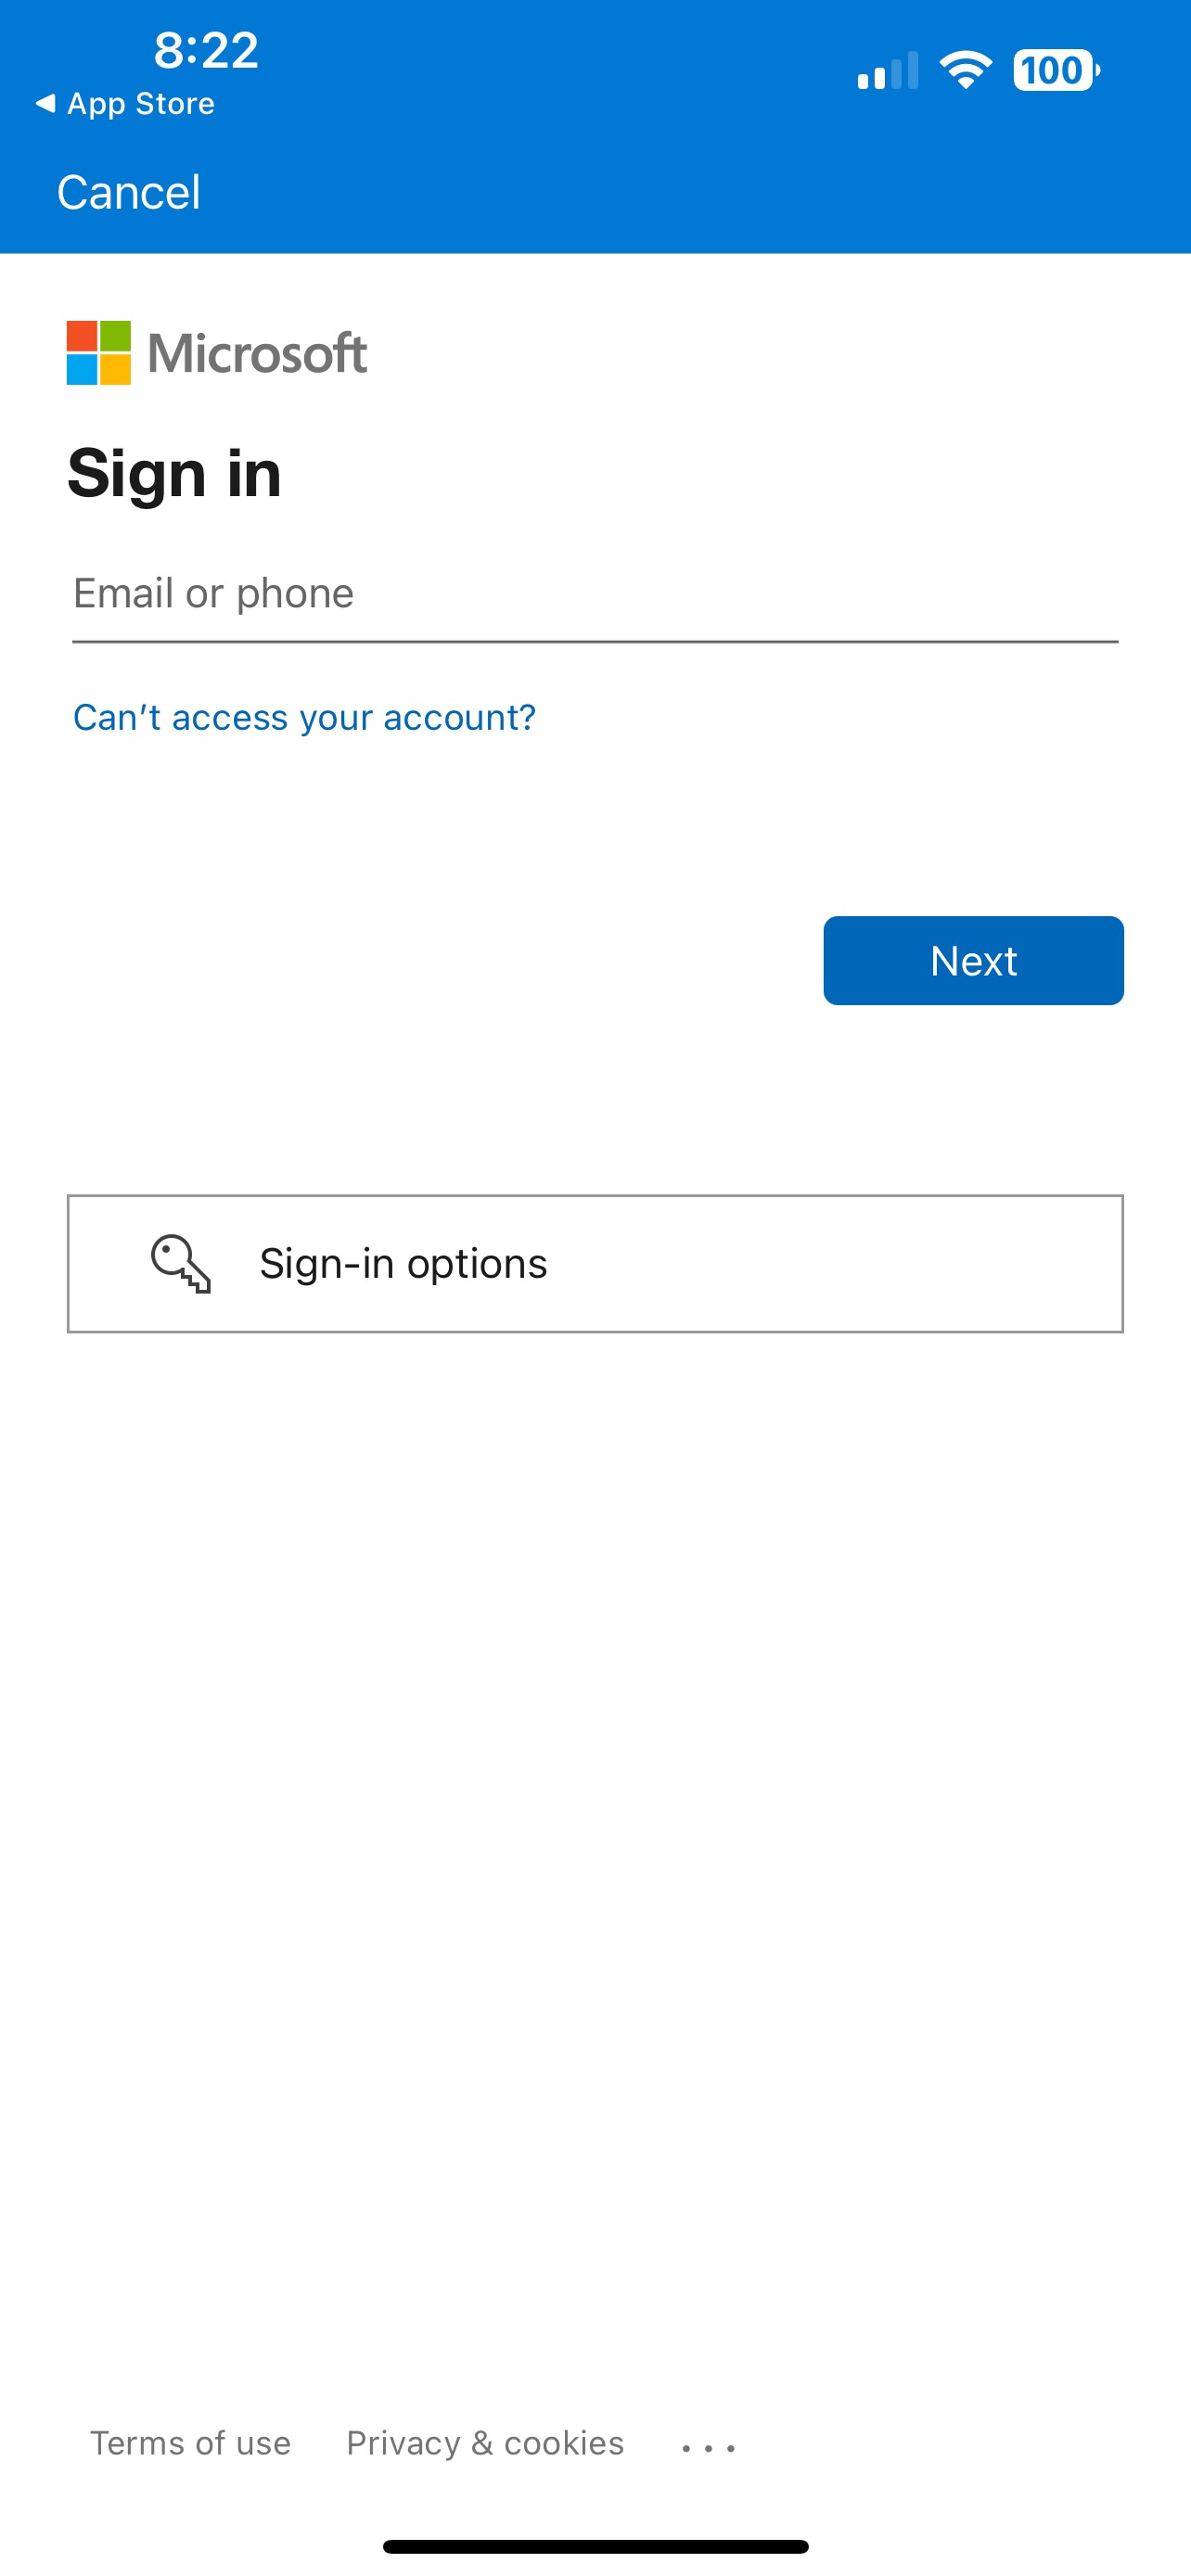
Step 3: Sign In With your Stout Credentials
- Enter your UW Stout Credentials including the domain (i.e. @my.uwstout.edu)
- Click Next
Step 4: Finish Setting up on a Web Browser
- Click the Open Browser button to open your default browser.

- If you aren't logged into your Microsoft Account, it will ask you do so again in this step.
Step 5 (Skip this Step if the Browser goes straight to Step 6): Select Add Sign in Method:
- Sometimes the browser will not go straight to the next step, so you need to click Add Sign in Method:

- Then select Microsoft Authenticator as the option:

Step 6: "Lets Keep your Account Secure"
- Click Next on this screen:

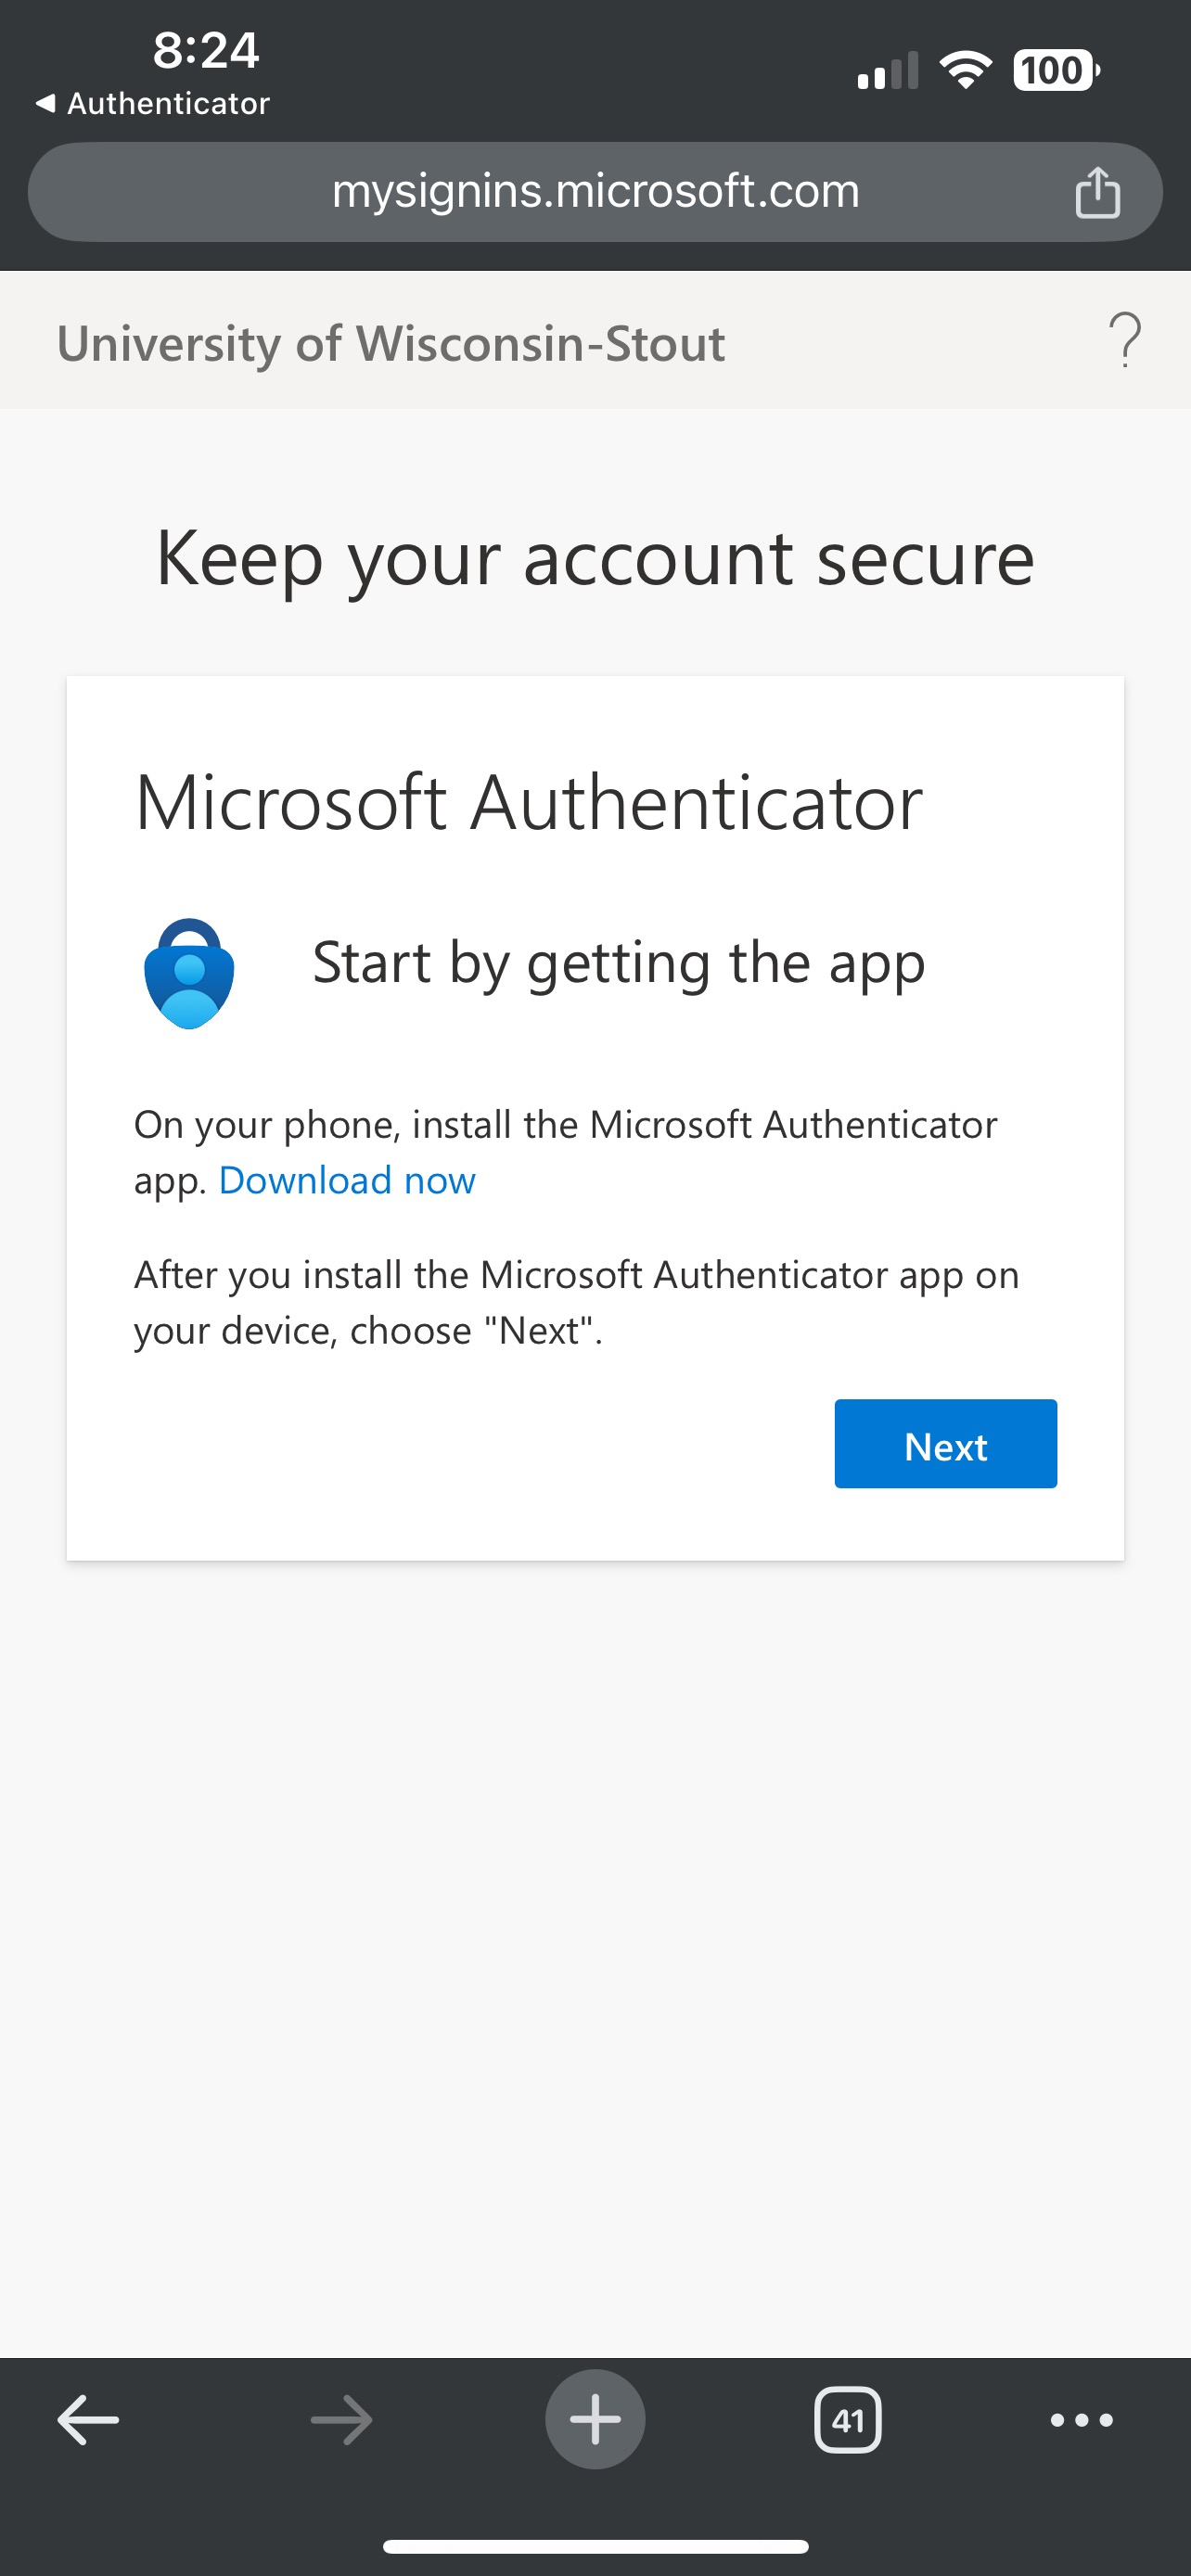
Step 7: "Start by Getting the App":
- Click Next on this screen:
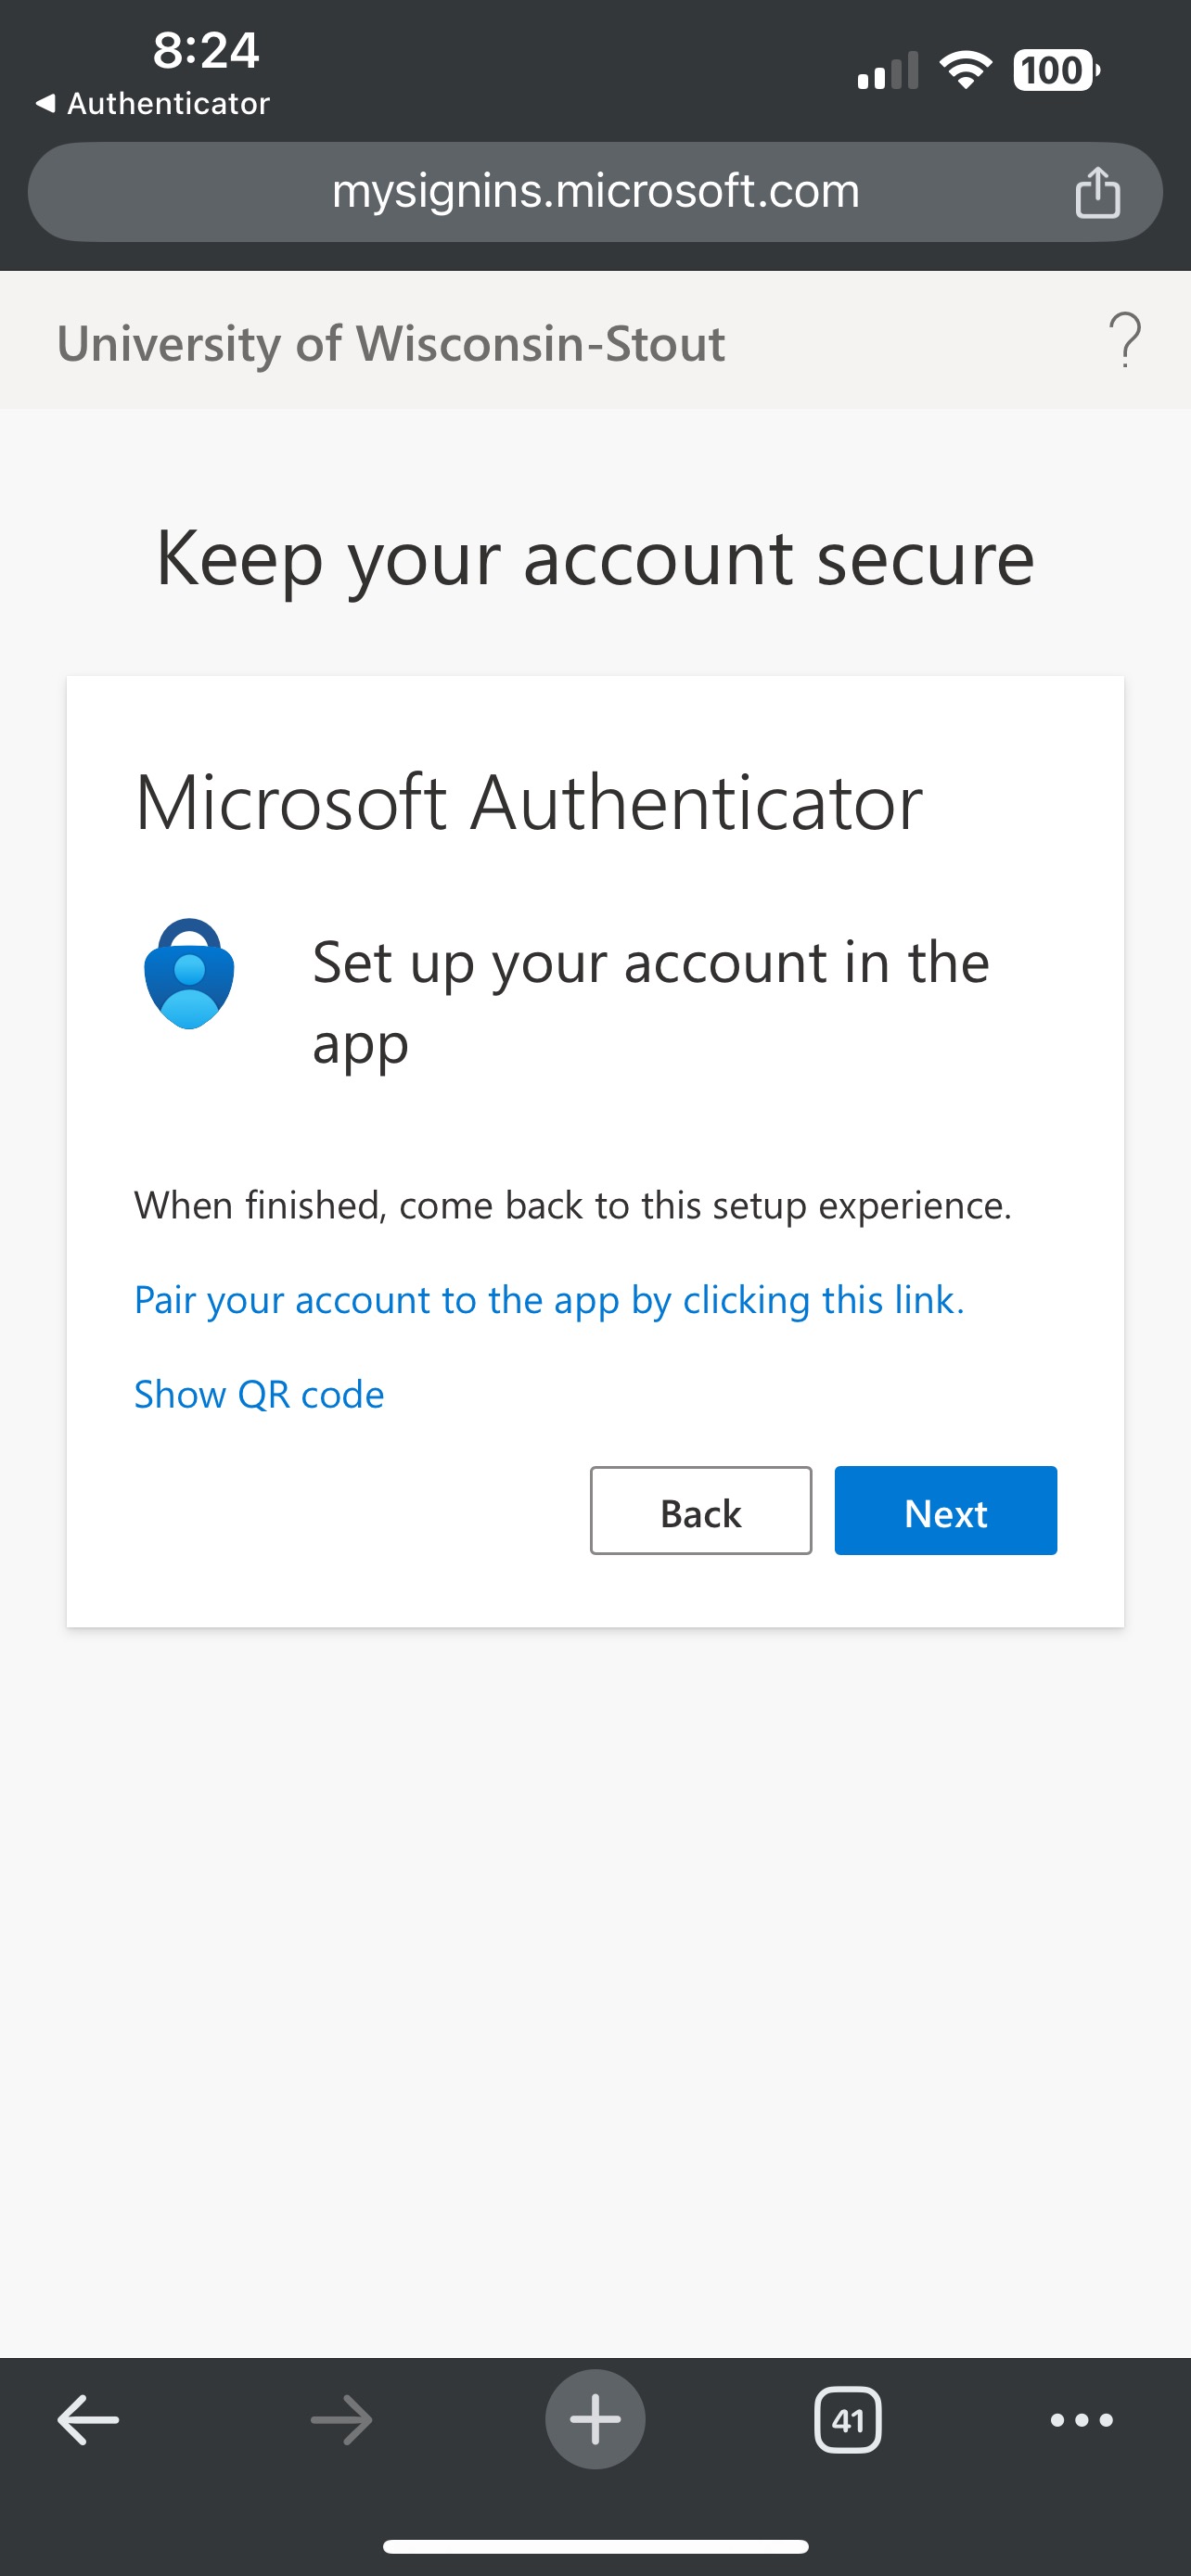
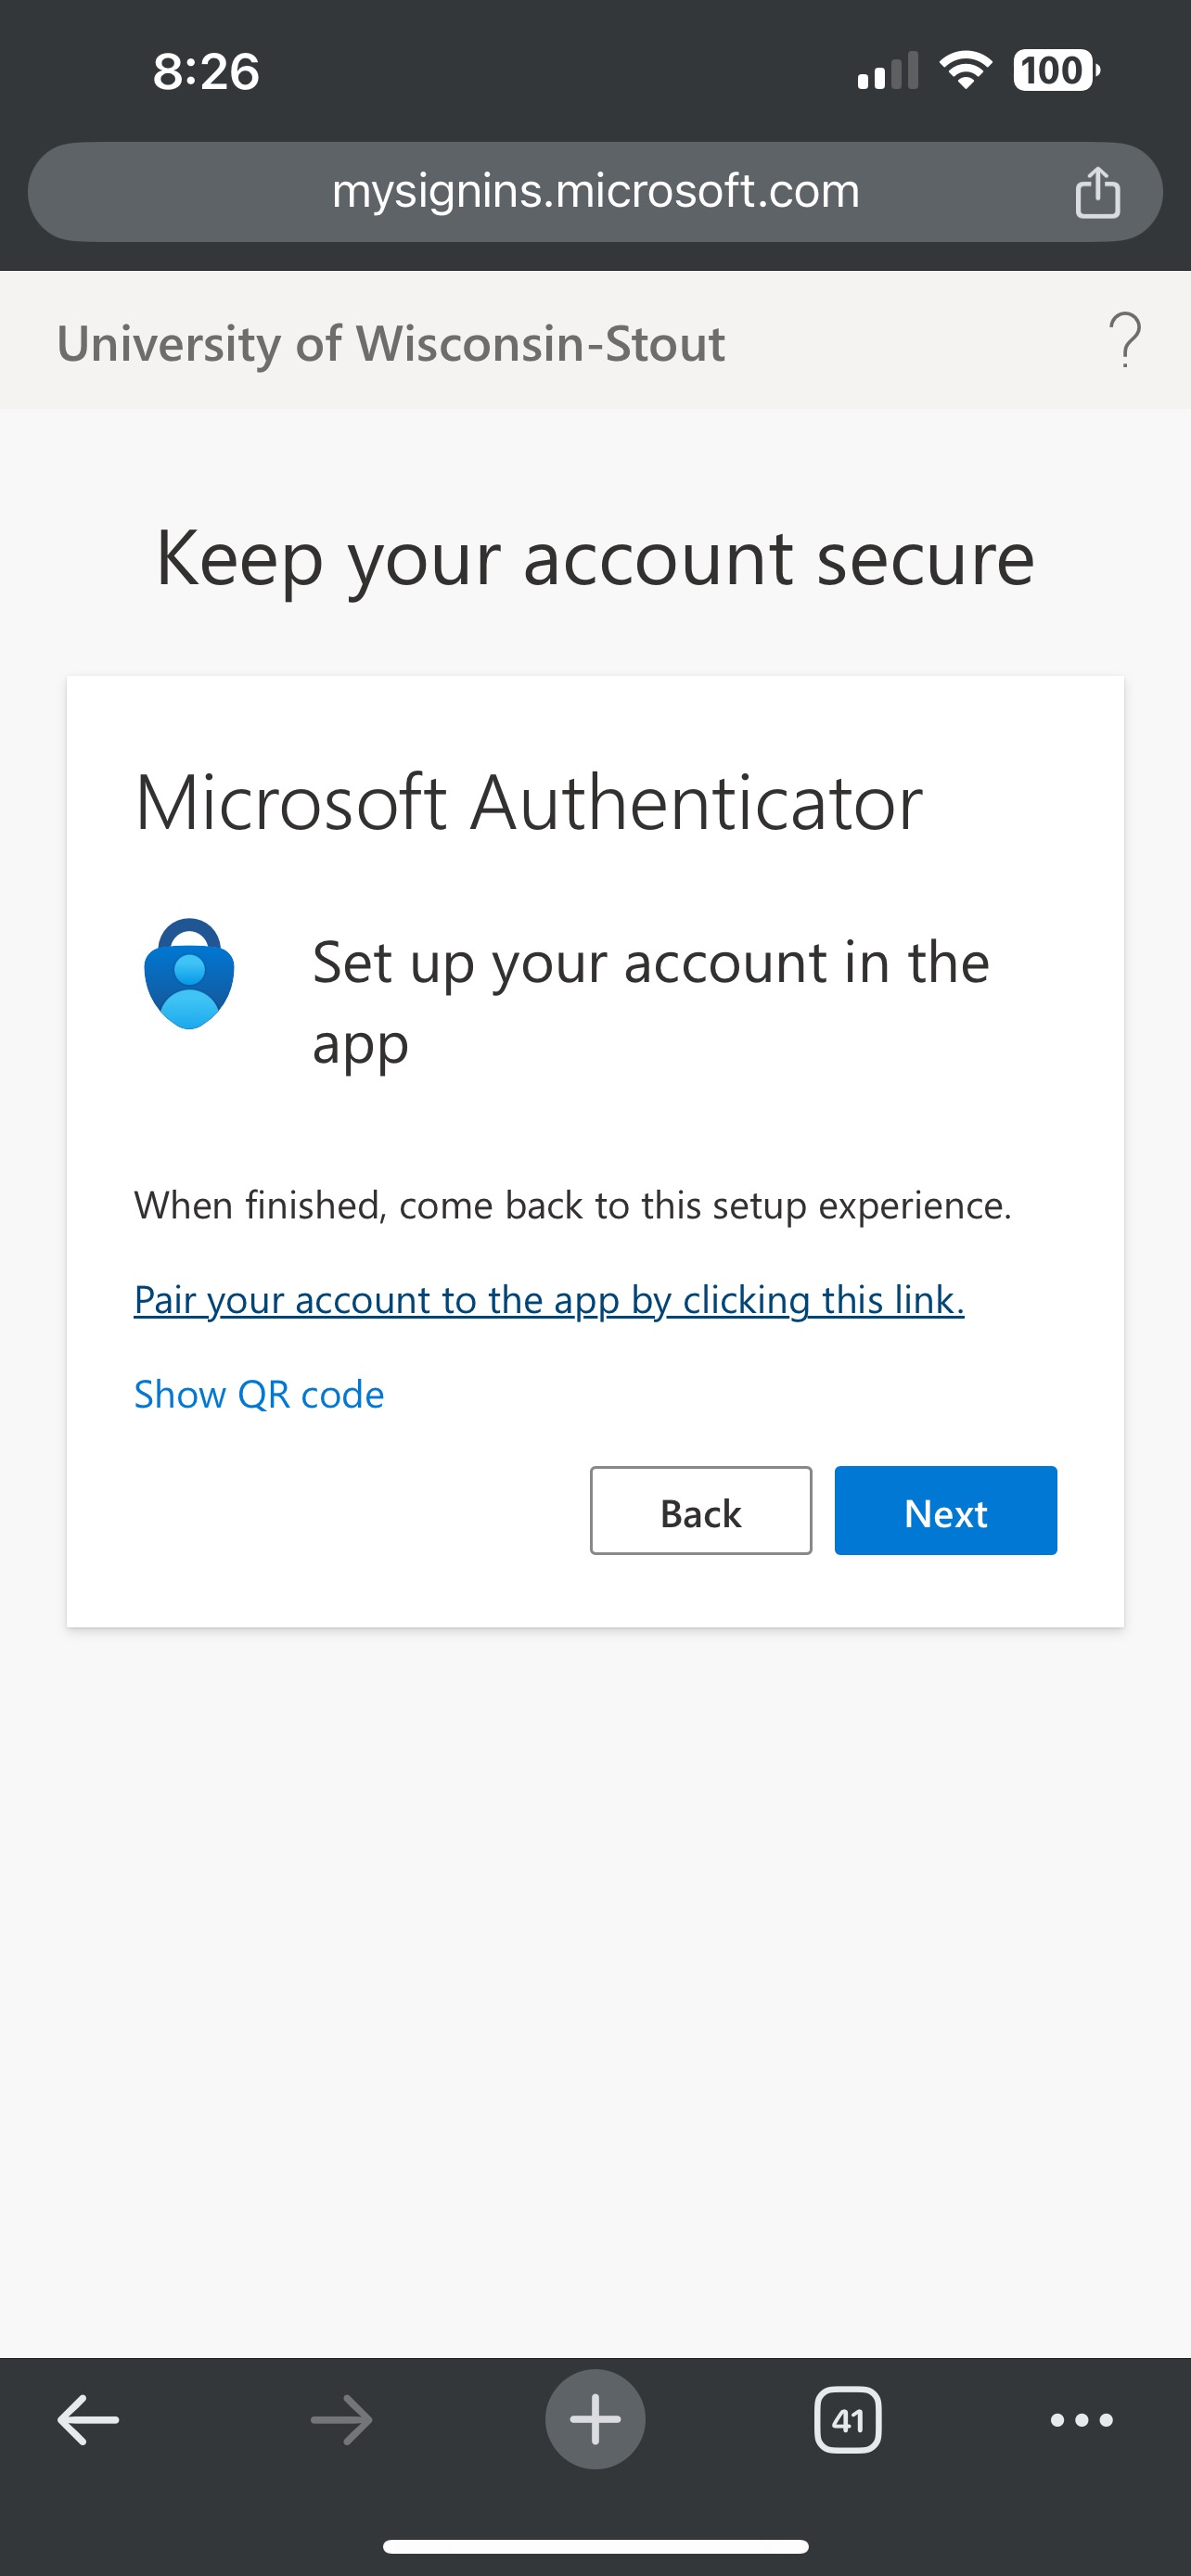
Step 8: "Set up your account in the app":
- Click the Pair your account to the app by clicking this link.
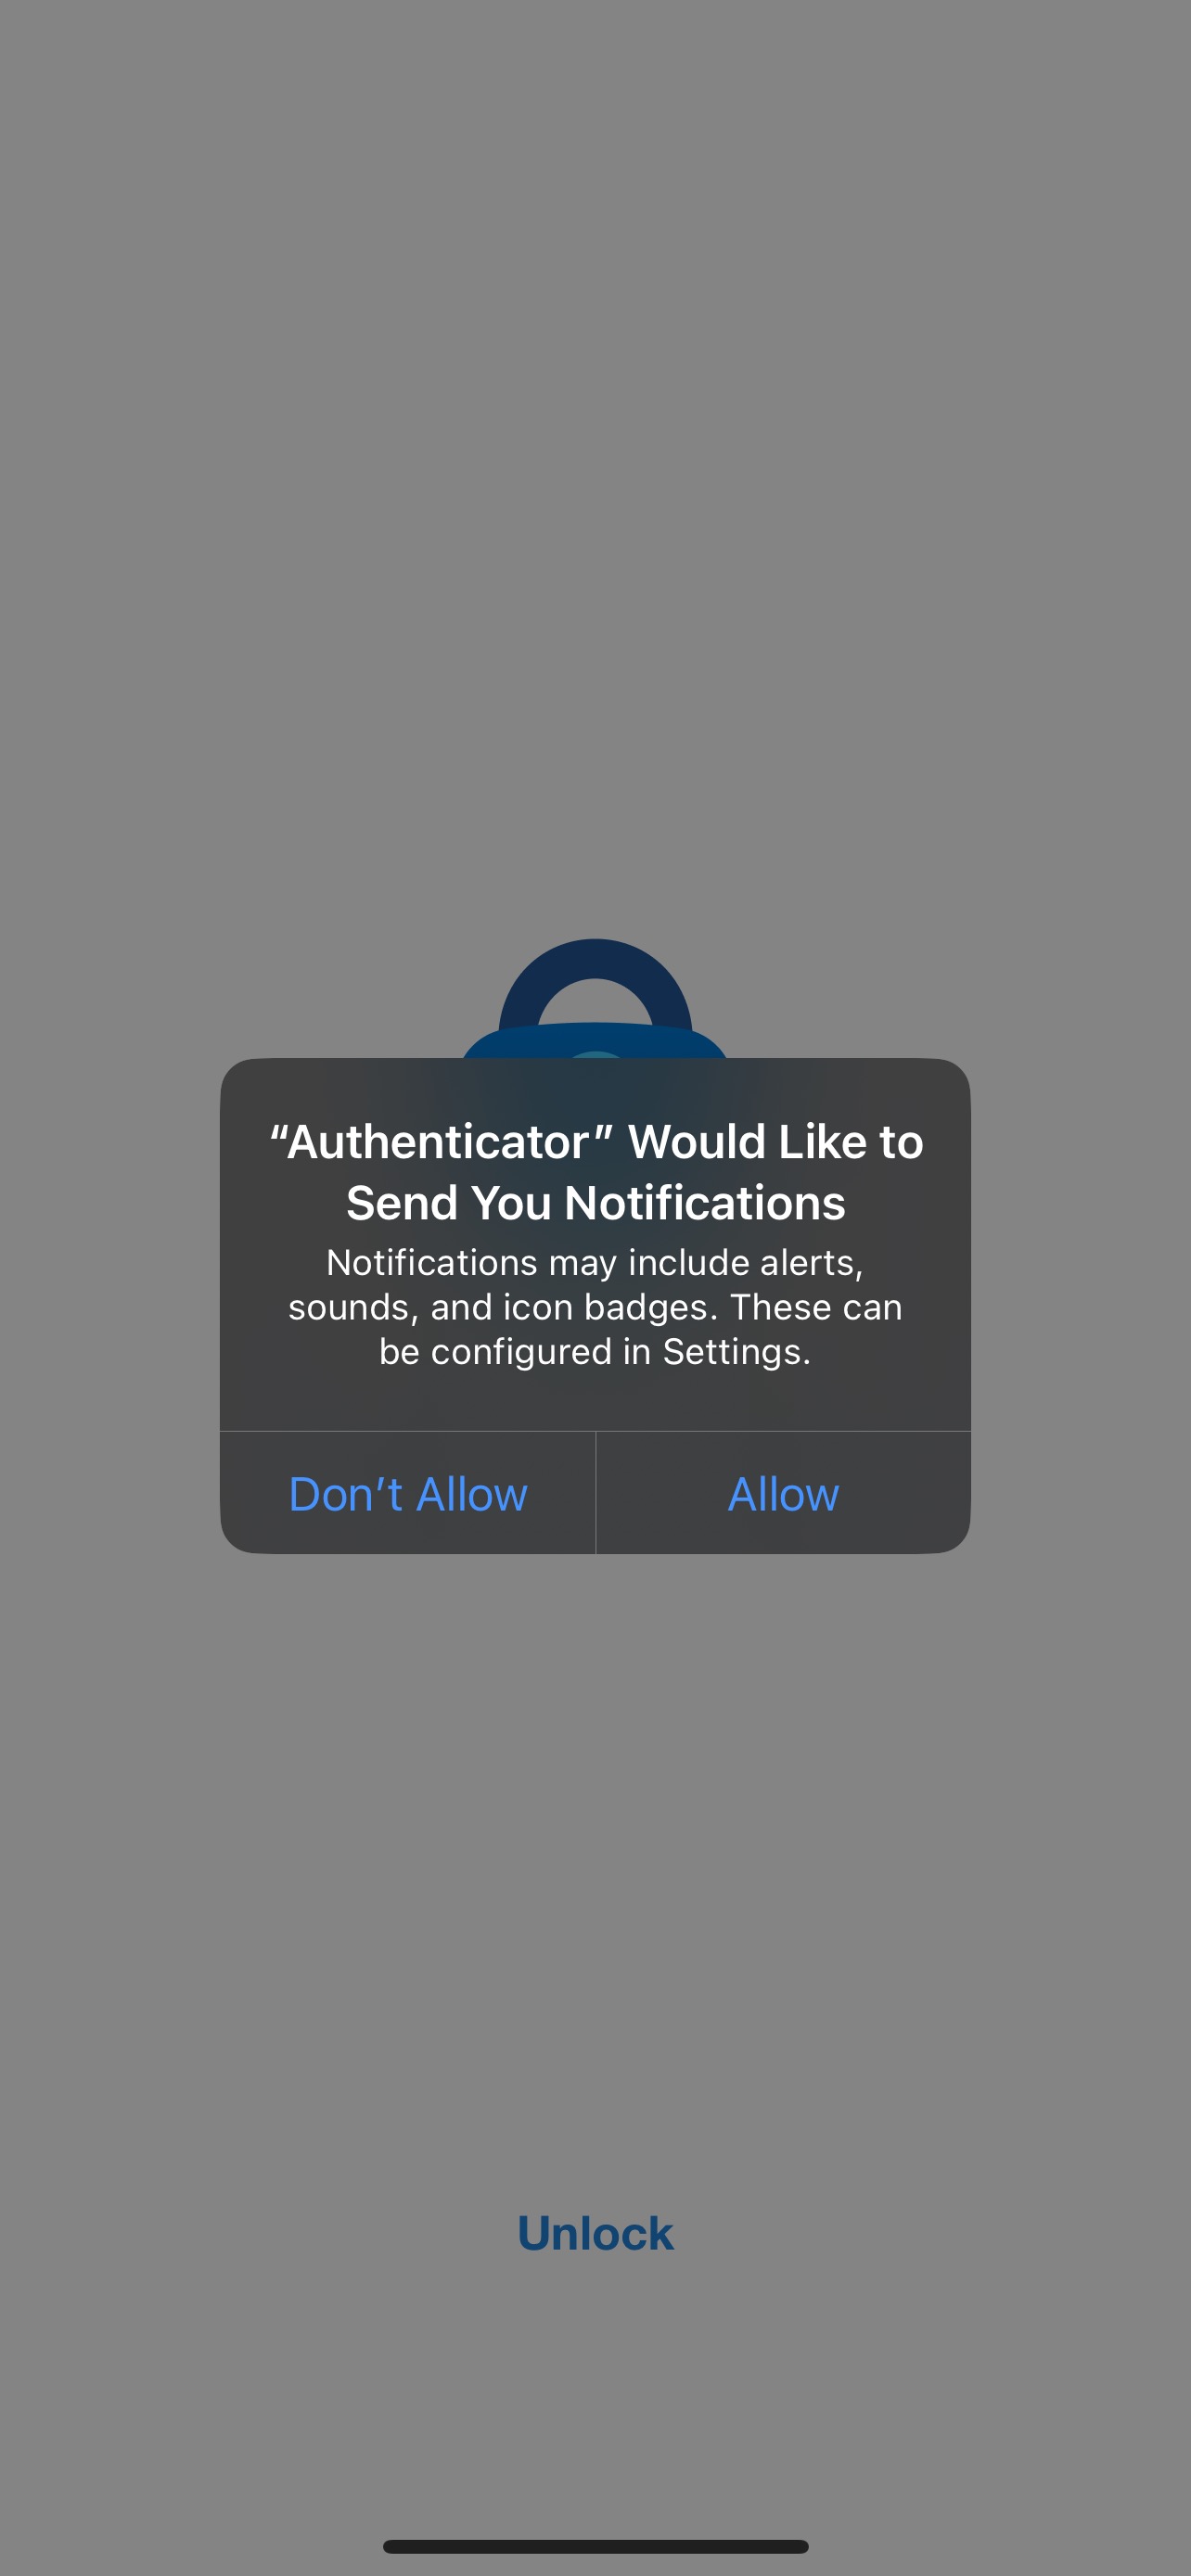
Step 9: Allow Notifications
- If Microsoft Authenticator prompts to allow Notifications, click Allow. This is necessary for it to work.
Step 10: Microsoft Authenticator Displays Your Account:
- If this step worked, Microsoft Authenticator will display your email within the home screen:

Step 11: Return to The Browser
- Return to the Browser App that opened in step 4.
- Select Next.
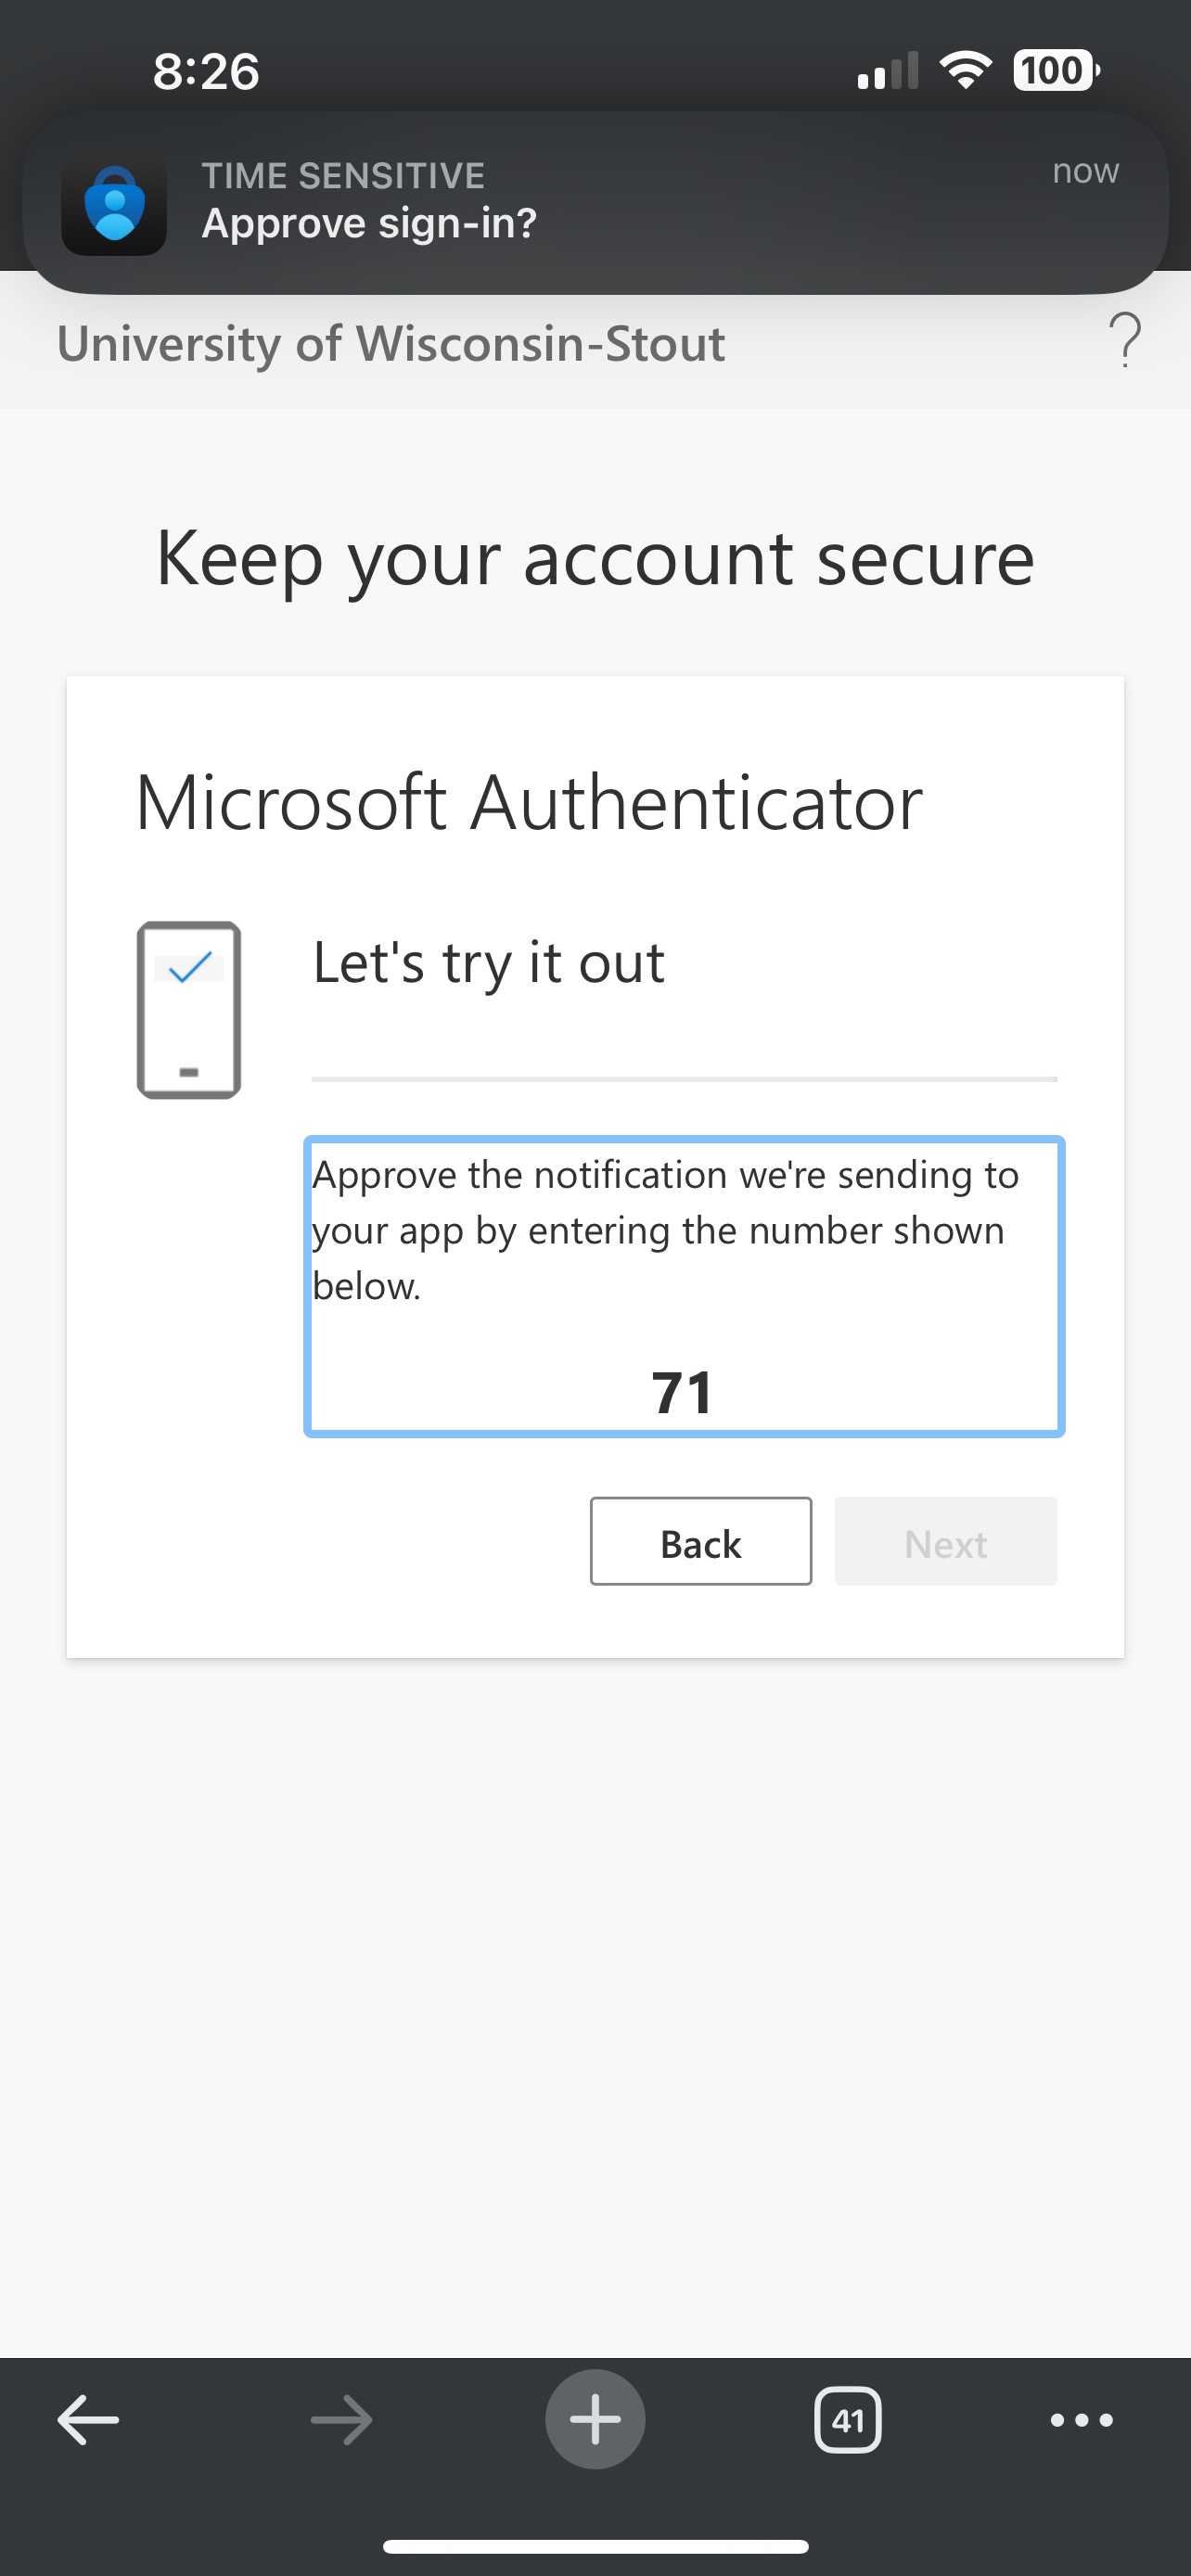
Step 11: Let's Try it Out
- Microsoft Authenticator will display a number on the Browser, and will notify your phone as shown below.
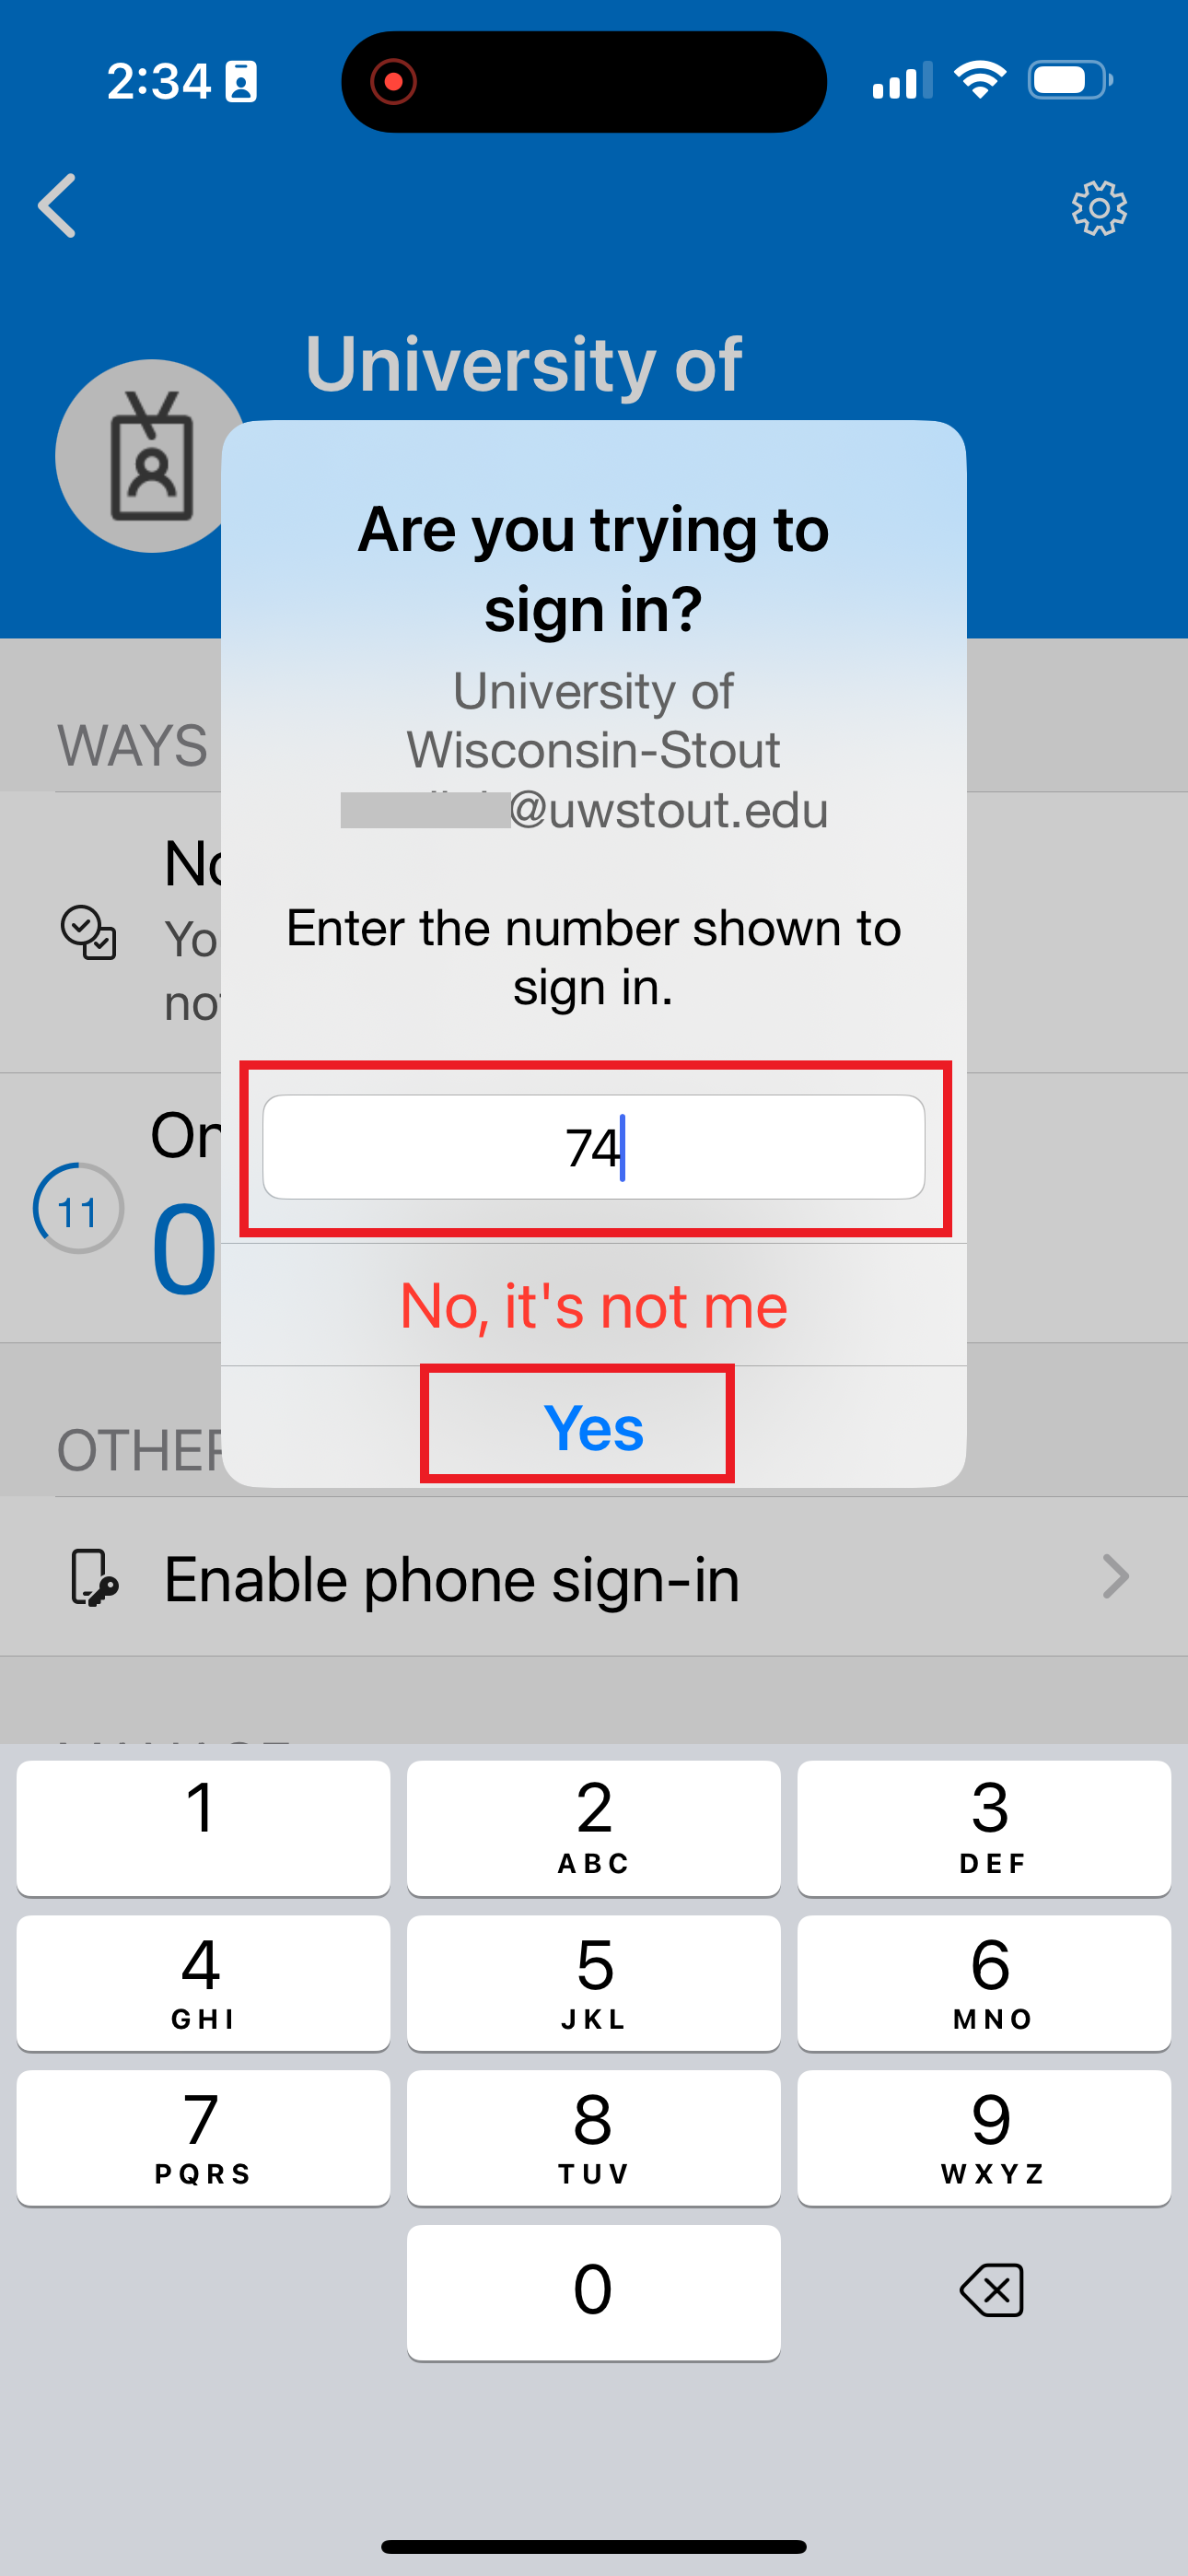
- Open Microsoft Authenticator through the notification. If you miss it, you can manually return to the app and it will display the prompt shown below:

- Select Yes
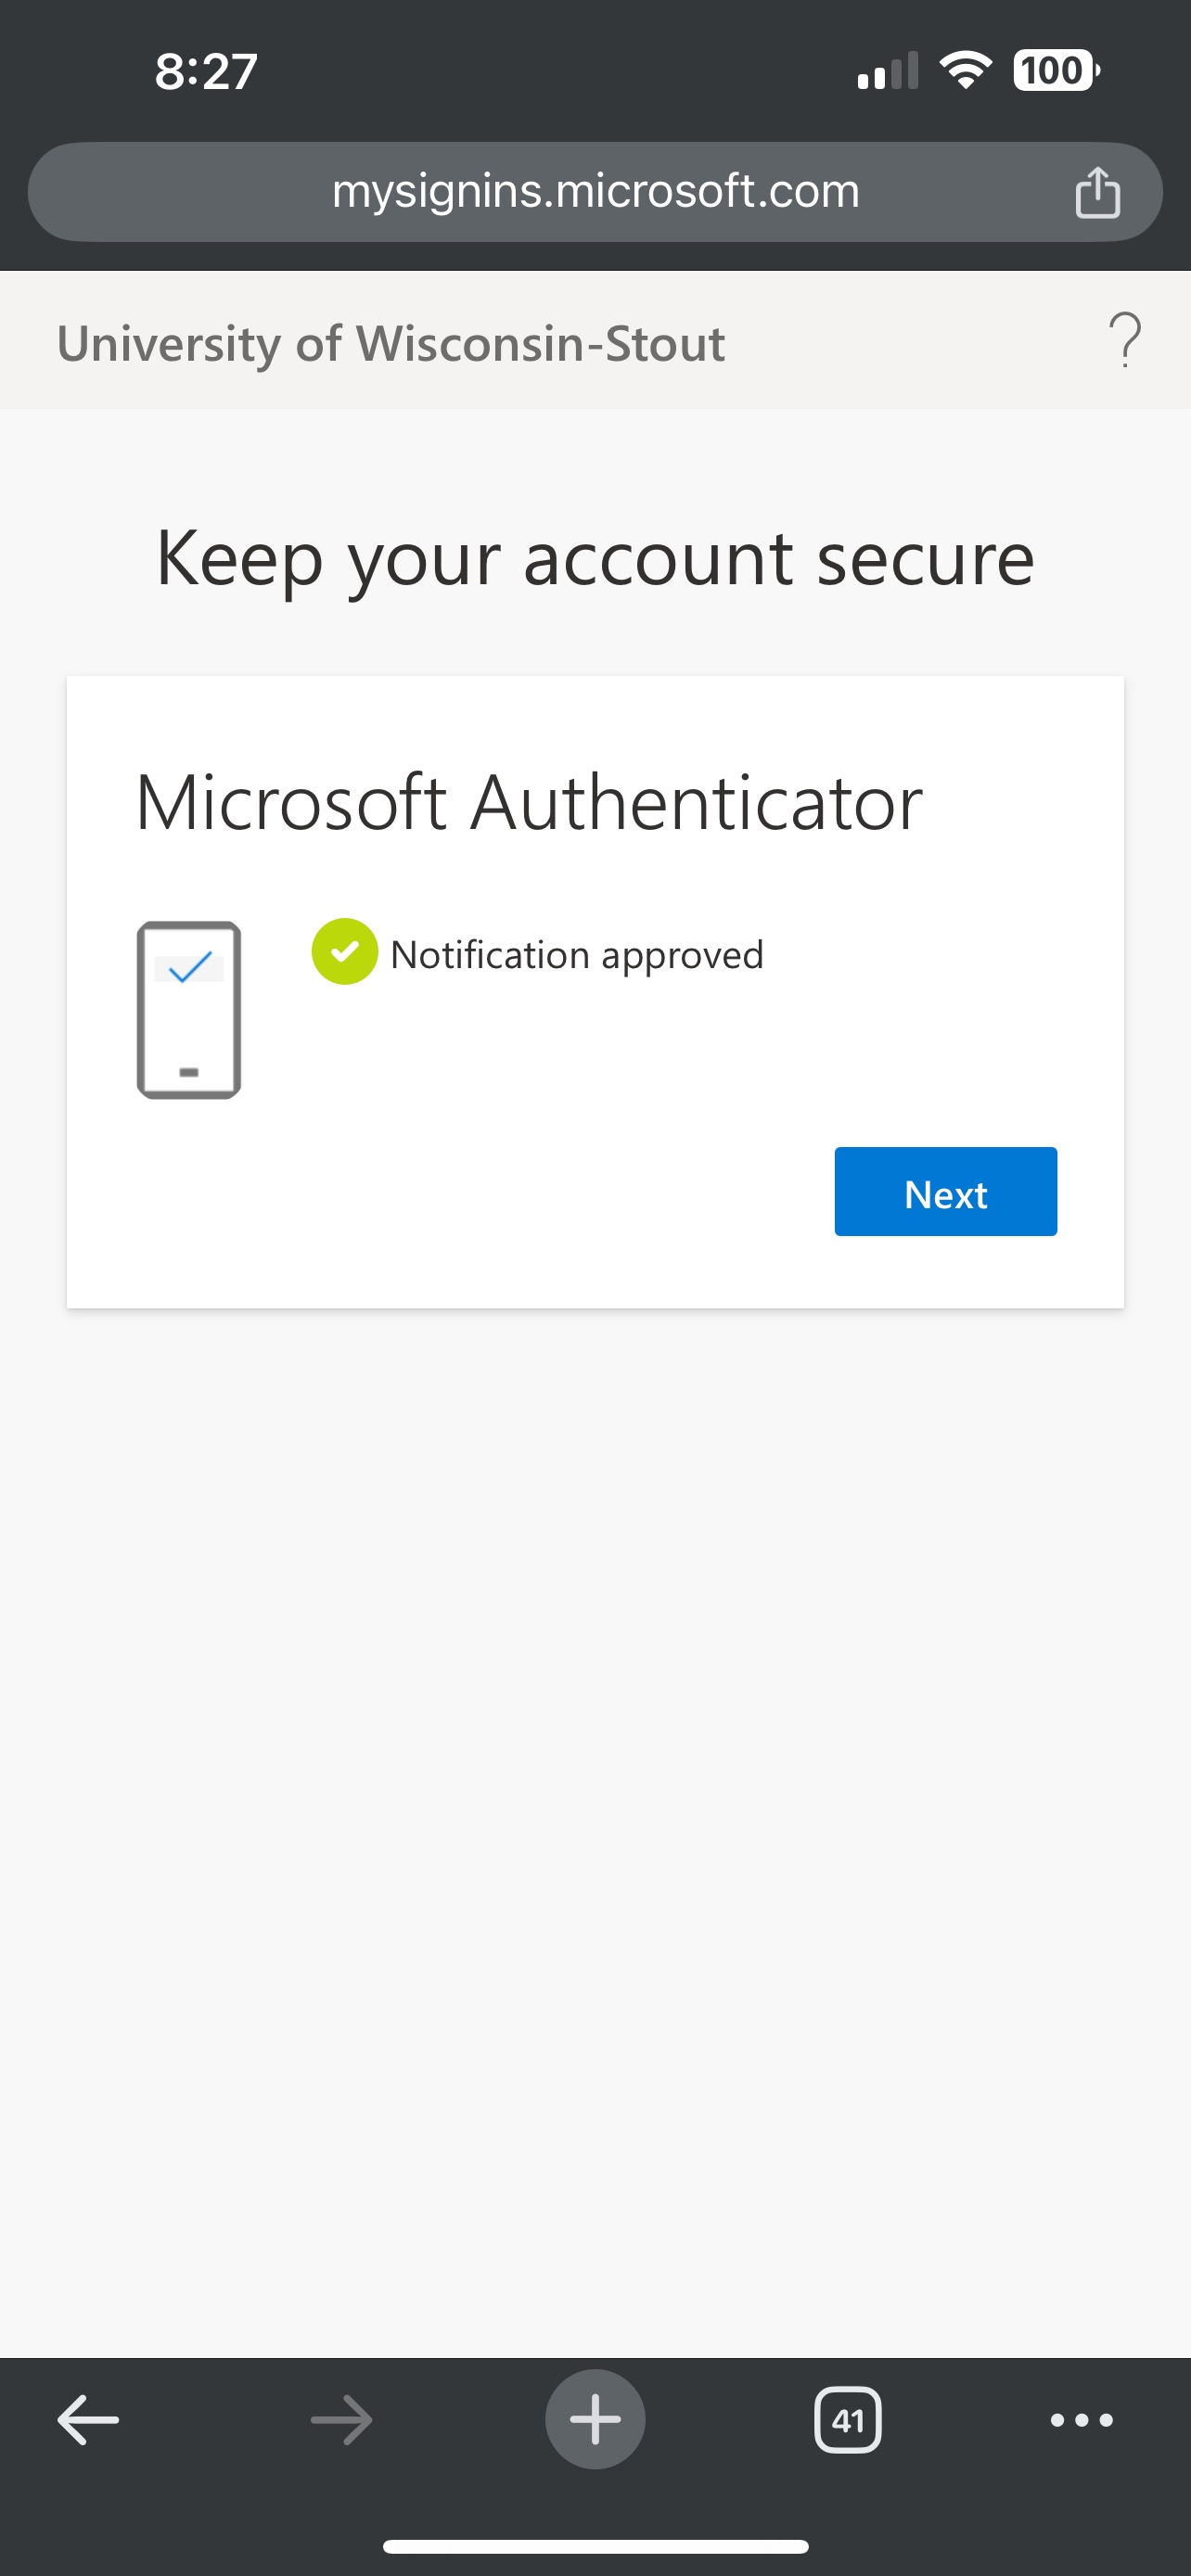
Step 12: Return Back To Browser (If not done, the pairing will not work)
- Return back to the browser from the previous steps. If Successfully done, the prompt will now display Notification Approved.
- Click Next.
Step 13: Complete
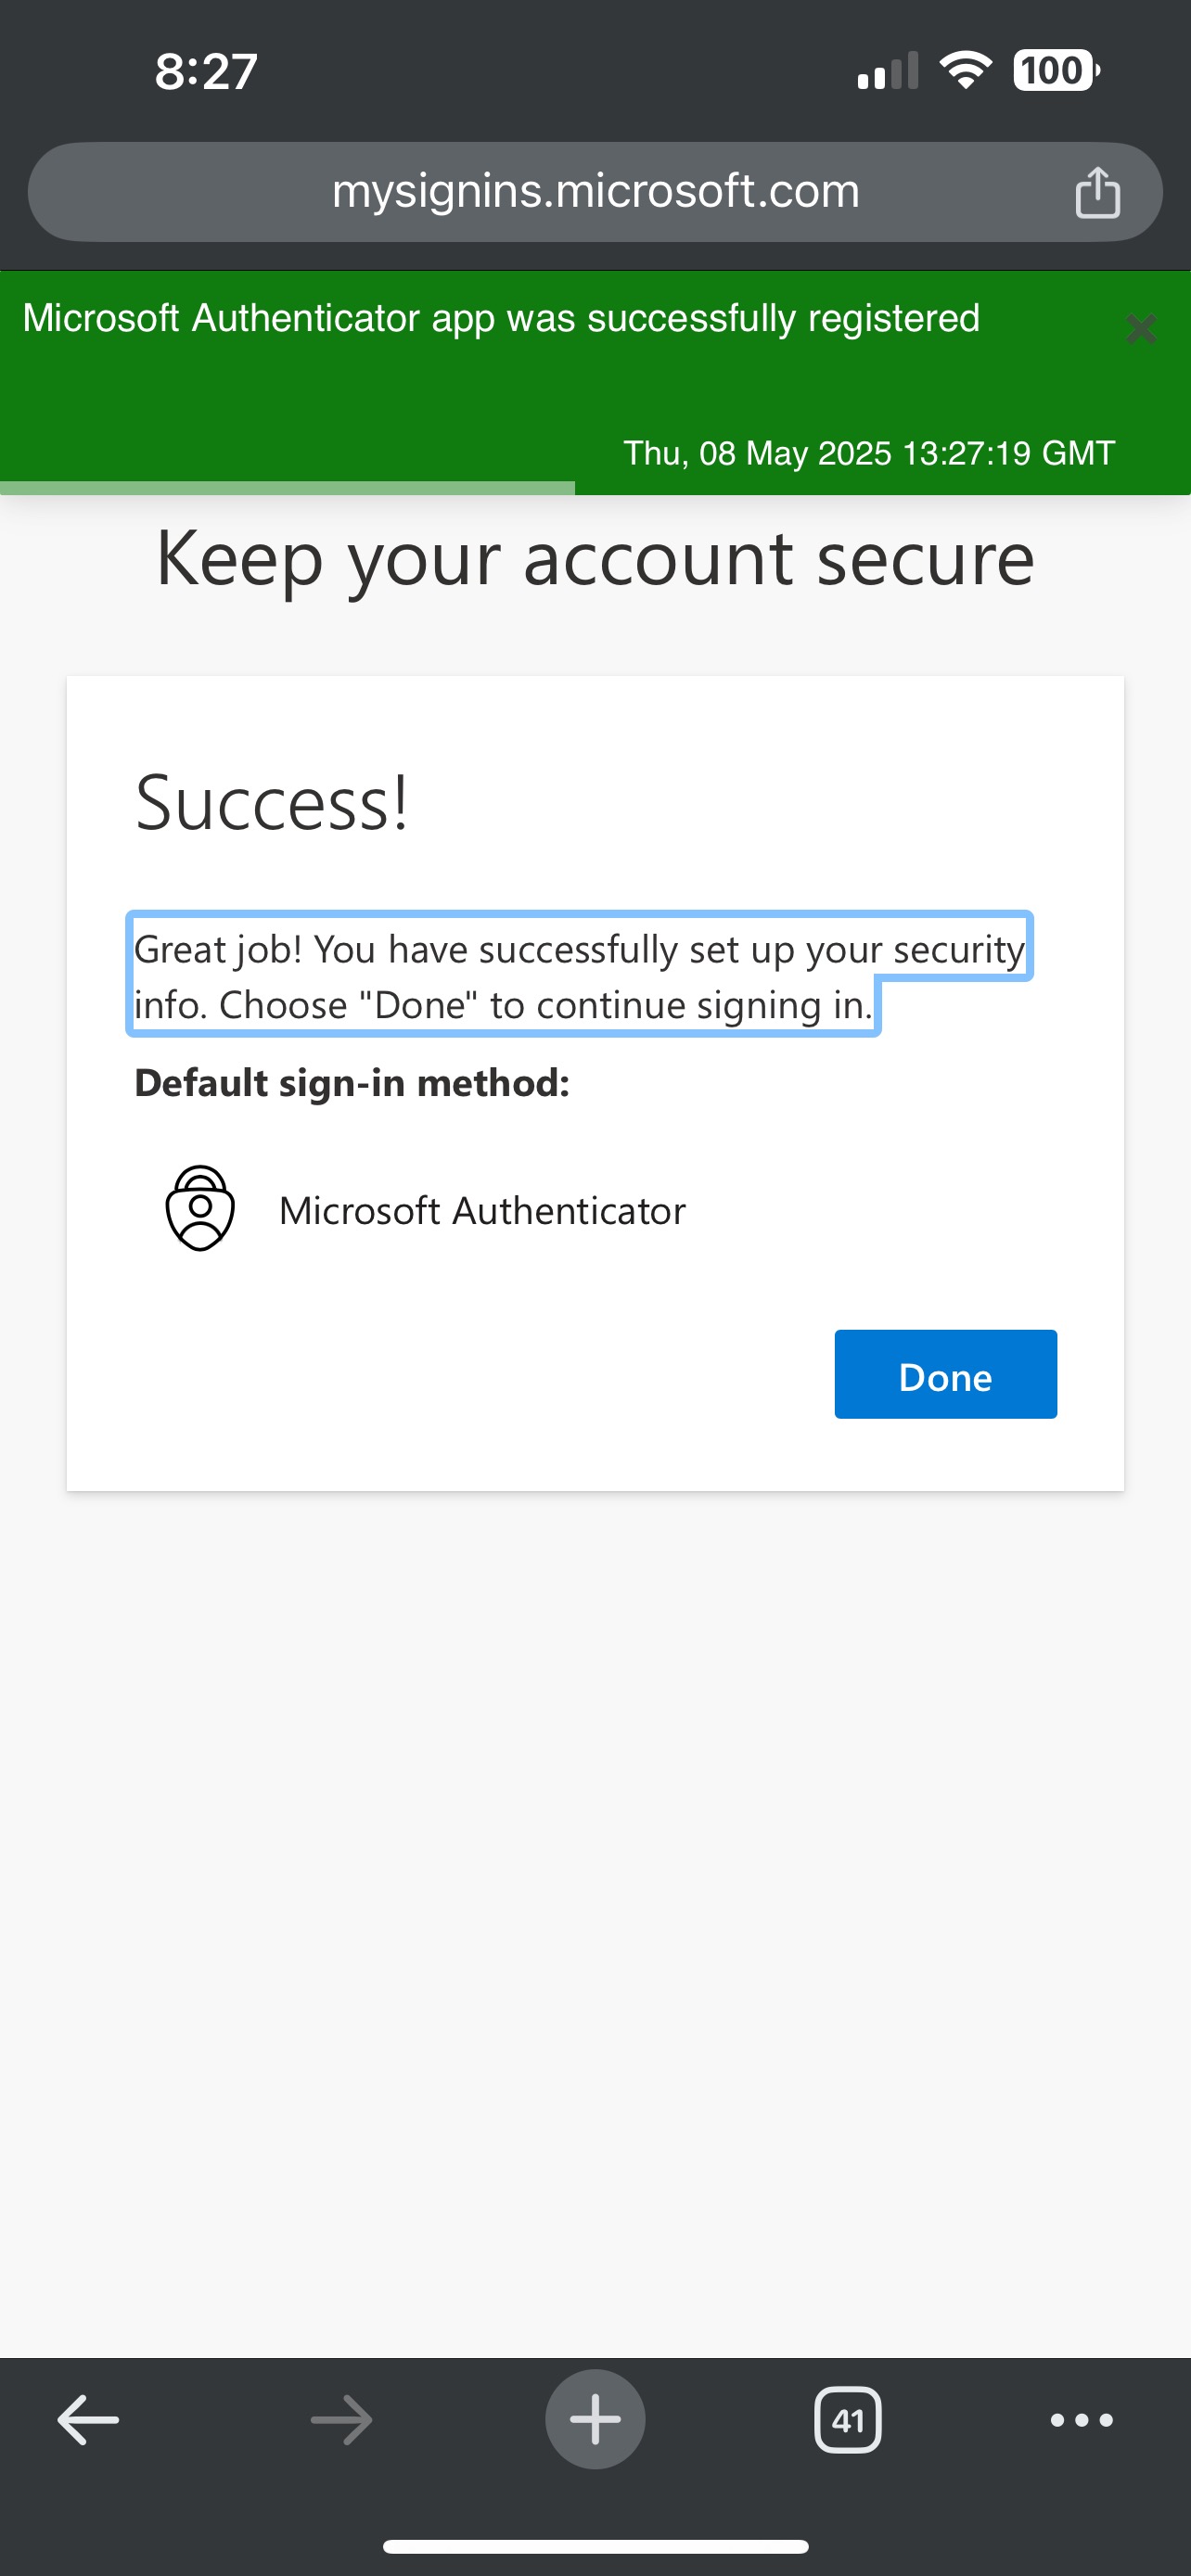
- The Prompt will display below if fully complete. Without this screen, the authentication might not have been setup correctly.
Enrolling with a Prompt from Microsoft - Using a Mobile Device
Please Note: Screen shots are for an iPhone but the process is similar on an Android device.
- When you sign into any Microsoft 365 web based application, you will be prompted for More information required to begin the Microsoft Authenticator enrollment. Click Next.

- Start by getting the App. (If you already have the Microsoft Authenticator app, click on Next.)
- Click on Download now to install the Microsoft Authenticator app.
- After the App is installed, return to the set up screen. Click on Next

-
Set up your account in the App
Click on Pair your account to the app by clicking this link. This will take you back to the Authenticator app.

- On the "Open in Authenticator" pop up, click on Open.

- Click on the University of Wisconsin-Stout account. This will pair your account.

- Return to the set up page to complete the setup. Note the number shown on the screen.

- Go to the Microsoft Authenticator App and enter the number on the set up screen. Click on Yes.
- Microsoft will approve your notification. Click on Next.

- If your account is successfully registered, you will see a Success message.

Enrolling with a Prompt from Microsoft - Using a Computer
When you sign into any Microsoft 365 web based application, you will be prompted for More information required to begin the Microsoft Authenticator enrollment. Click Next.

-
Download the Microsoft Authenticator App if you haven't done this yet.
Download the Microsoft Authenticator App
Download the Microsoft Authenticator App if you haven't done this yet.

Visit the Apple app store or Google play store on your mobile device and install the Microsoft Authenticator app. Alternatively, visit aka.ms/authapp to find QR Codes that will send you to the store for your Apple or Android mobile device.
You may also search in the Google Play store or Apple App store for "Microsoft Authenticator" to manually download.*(If manually downloading, please be aware of of the app that you are downloading. It should be fully named "Microsoft Authenticator") -
Computer: Set up your account on the Authenticator App. Click on Next.

- Computer: A QR Code will appear in the next step. You will come back to this and scan with your mobile device.

- Mobile Device: Open the Microsoft Authenticator app on your mobile device and select Add work or school account.
- iPhone users press the plus sign button in the upper right to add an account, then select work or school account.
work or school Android iPhone 
.png)
- iPhone users press the plus sign button in the upper right to add an account, then select work or school account.
- Mobile Device: Choose Scan a QR code.
Scan QR code Android iPhone 

- Computer: Back on your computer, scan the QR code with the Microsoft Authenticator app on your mobile device to enable your account. Once the scan is successful, click Next. (Make sure you continue to step 7-9)

Can't Scan?
If you are unable to Scan the QR code, select the Can't Scan image? option which will provide you with a code to copy and a URL to visit to activate.
If you can't scan because it says that your account has already been activated and there is a UW-Stout account on your mobile app, please click Next to continue as normal.
Please contact the helpdesk at 715-232-5000 if errors still occur.
.png)
- Let's try it out! Microsoft Authenticator will prompt you on your computer screen with a number to enter in your mobile app. Your mobile app will detect that a sign in is being requested.

- Enter the number shown in your Microsoft Authenticator App on your mobile device and then click Yes on your mobile device to approve.
| Android | iPhone |
|---|---|
 |
 |
Success! Your MS Authenticator account has been set up.


