Topics Map > Service Catalog > Communications and collaboration services > Email
Outlook (Windows): Add a Shared Mailbox
How to add a shared mailbox to Outlook (Windows) org emails organization email accounts after being added to the shared email group.
*If you are not a member of the email group, you will not be able to open the file for the email group even if you are an owner.
- Please see Manage a Shared Email Group KB
Outlook App - Add Shared Mailbox
After the user has been added to the appropriate shared mailbox members group they should do the following:
-
- Open Microsoft Outlook
- Click File tab in the Toolbar
- Click Account Settings button, select Account Settings.

- Select the E-Mail tab.
- Highlight your mailbox, click the Change button

- Click the More Settings button.

- Select the Advanced tab.

- Click the Add button.
- Type the Shared E-Mail Address and click Ok.
*Note* you do not need to enter the entire email address, just the "username".
- Click the Apply and Ok buttons.

- Click Next, Done, and Close buttons
View Shared Mailbox
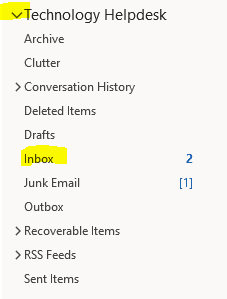
- To view the shared mailbox, click the drop-down menu next to the inbox name and select Inbox.
The shared mailbox should populate under your main mailbox (left panel).
NEW Outlook App - Add Shared Inbox
- Right click on your account name in the left-hand navigation pane of the New Outlook. (Example. DoeJoh@uwstout.edu)
- Select Add Shared Folder or Mailbox in the popup menu.

-
In the Add shared folder or mailbox window, type the name of the shared mailbox you want to access, for example, techdesk@my.uwstout.edu

- After adding the shared inbox, restart outlook by closing it out completely and opening it again.
- Once New Outlook reopens, the shared inbox should appear on the left-hand navigation pane along with your personal inbox.


